|
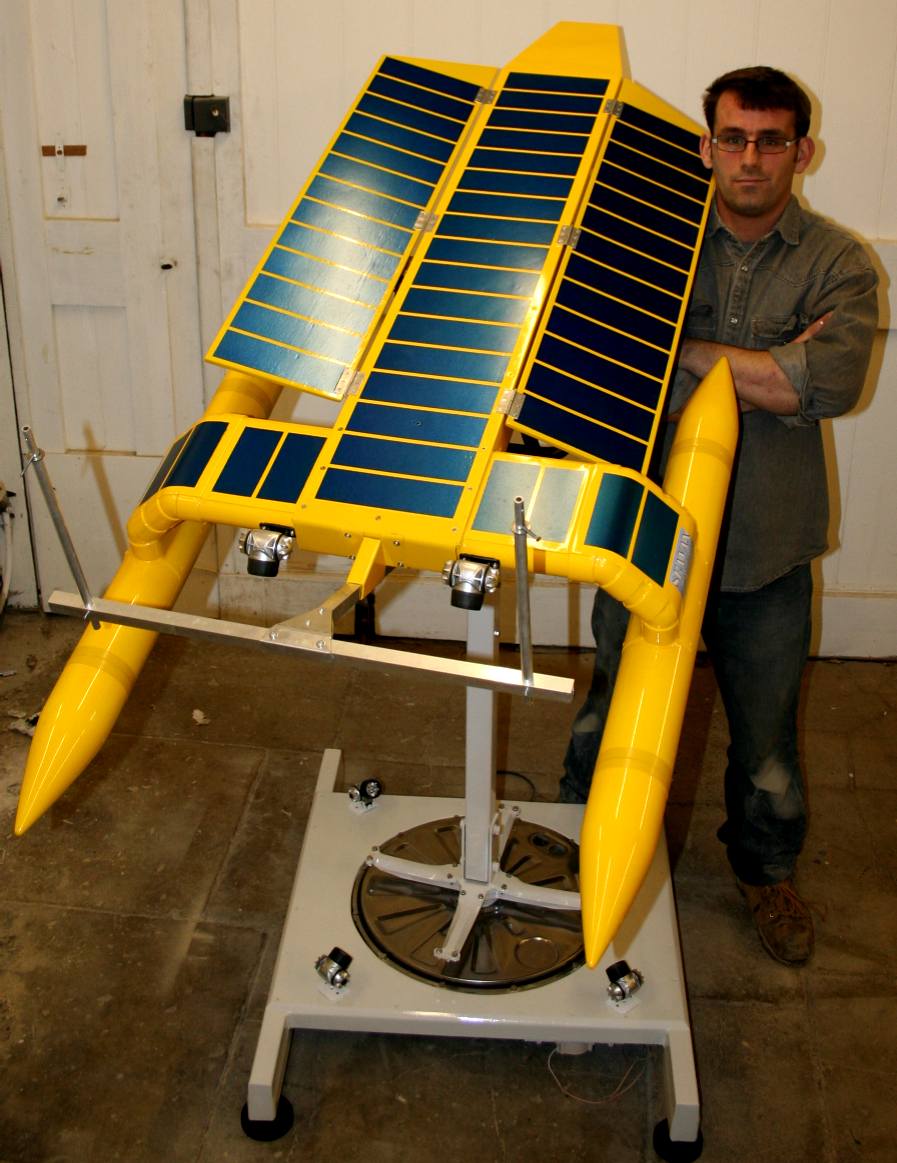
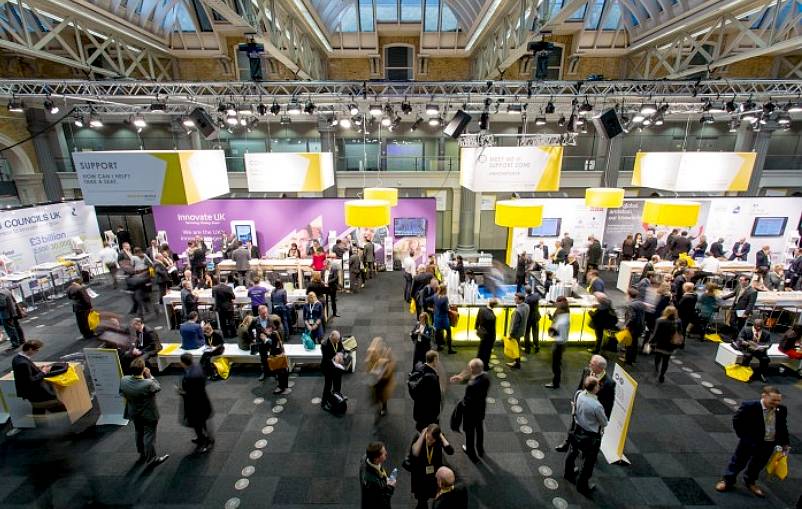
INNOVATE2015 - REVOLVING SHOWCASE DISPLAY STAND
|
||||||
|
PROJECT MANAGER & PURCHASING SPECIALIST - Chris and Richard rolled up their sleeves over the August Bank Holiday to design a stand for the Innovate2015 show. The challenge was to build a space saving display that would be portable and capable of being adapted for other events in 2016.
Beaches on the south cost of England are littered with plastic waste from heavy rains washing bottles and wipes from the land to the shores of the English Channel. Plastic and other flotsam is also thrown up onto our beaches from the sea. It is a two-way stream that is killing wildlife and making holiday destinations less attractive to tourists. The same is happening all around the world, such as in the Mediterranean and even as far afield as Hawaii, which is one of the most polluted areas in the Pacific Ocean. Who then is doing anything about the problem and who is ducking their responsibilities.
The SeaVax team do not want to point any fingers, because until now there has been no solution. Waste disposal companies that collect our trash weekly, do not have the technology to provide a coastal patrol service - and even if they did, councils do not see this as something they have to concern themselves about. At the moment its all down to volunteers of local charities who organize beach cleanup parties.
At least that is the response that BMS have received to date from councils in the south east. Mind you, the company was talking to managers rather than the portfolio holders who decide where and on what to spend ratepayer's (your) money. At the moment they'd rather spend money on Air Shows to draw in the crowds, than on developing a truly sustainable local economy.
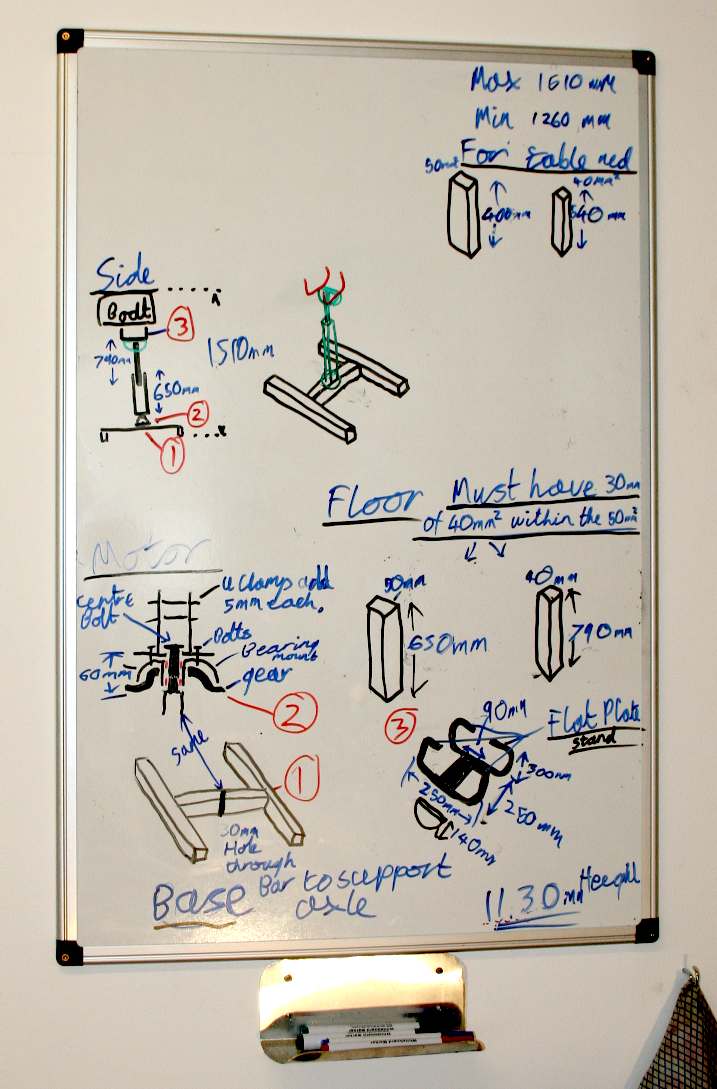
BACK TO THE DRAWING BOARD - We have a dry marker board in our workshop for brainstorming design sessions. In this case the team wanted to fabricate a small stand that would be capable of tilting the 2 metre model to 45 degrees - mainly to save on floor space. A secondary objective was to produce a motorised option, for other events, where, with suitable lighting the model could become an attractive feature. These are the notes made by Chris while the team were working out what was possible using items in the grounds. At this stage there is no underlying theme, but one will soon develop.
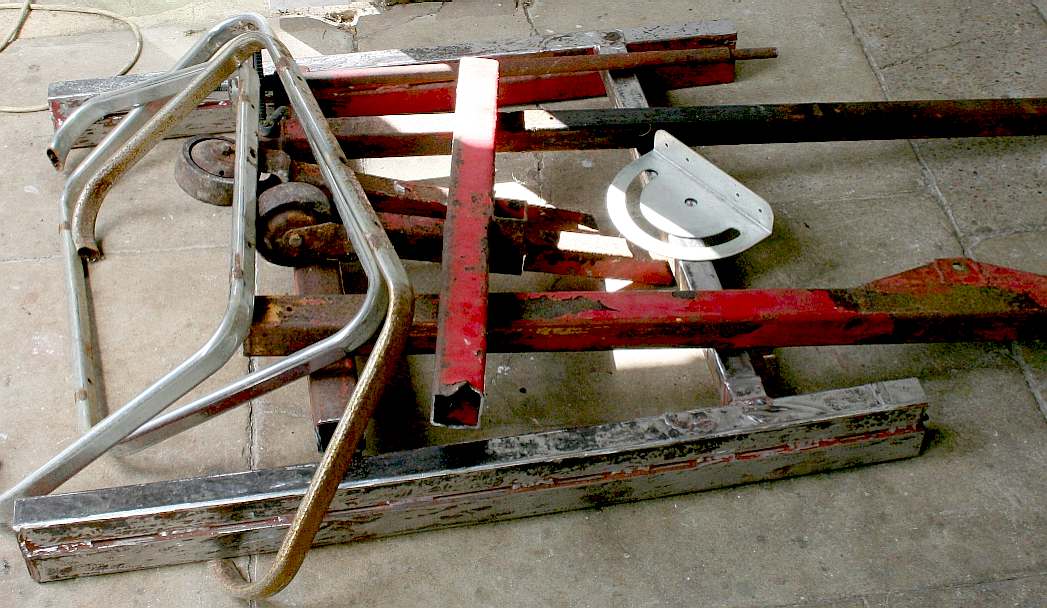
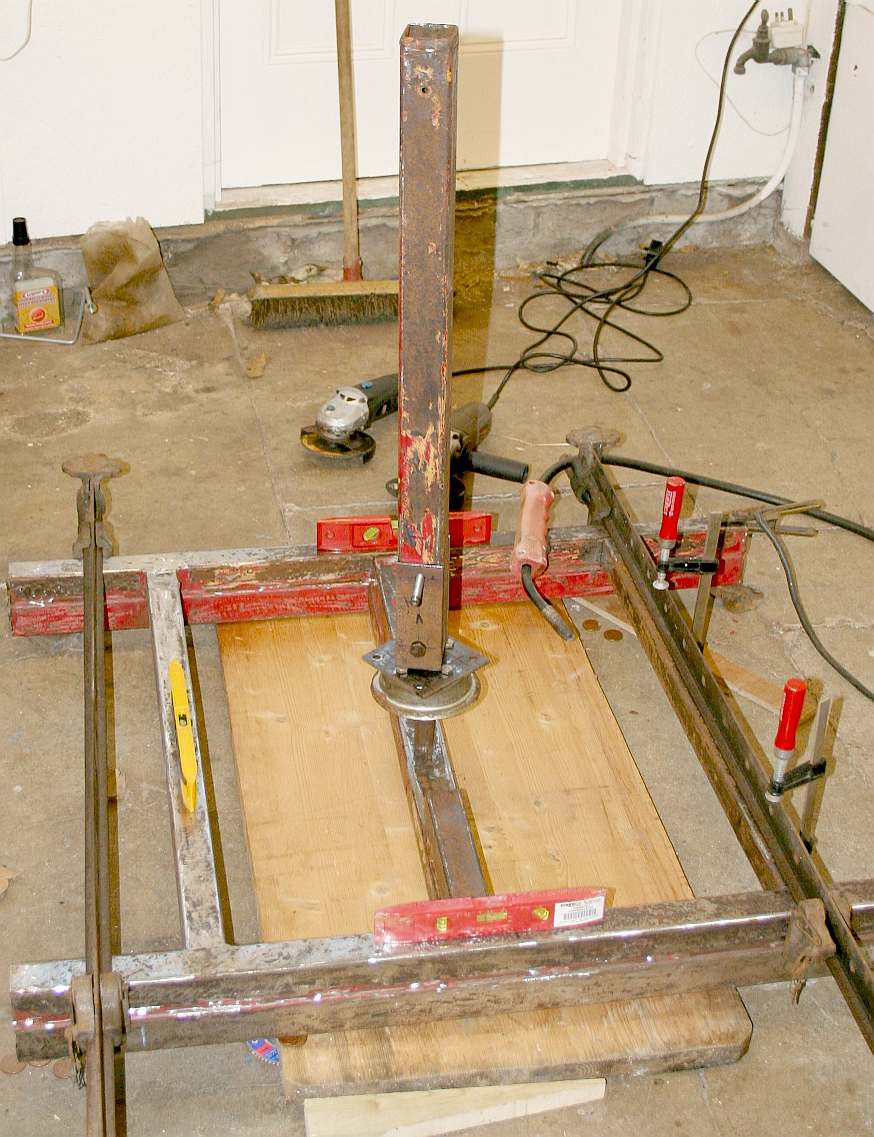
SCRAP HEAP CHALLENGE - Using only steel from items that were due to be sent to our local metal waste handler (H. Ripley & Co, Apex Way, Hailsham, East Sussex, BN27 3WA - T: +44 (0)1323 440672 E: info@hripley.co.uk) the team accumulated a pile of donor parts - mostly from an old engine hoist, that in the world of electric vehicles, was surplus to requirements. From our experience we can say that H Ripley (known locally as Ripley's) operates their recycling yards to an exceptionally high standard. They also support local innovation.
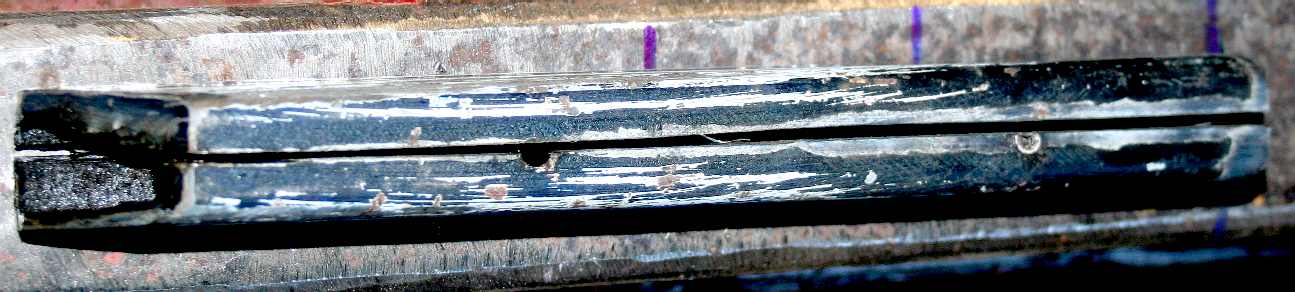
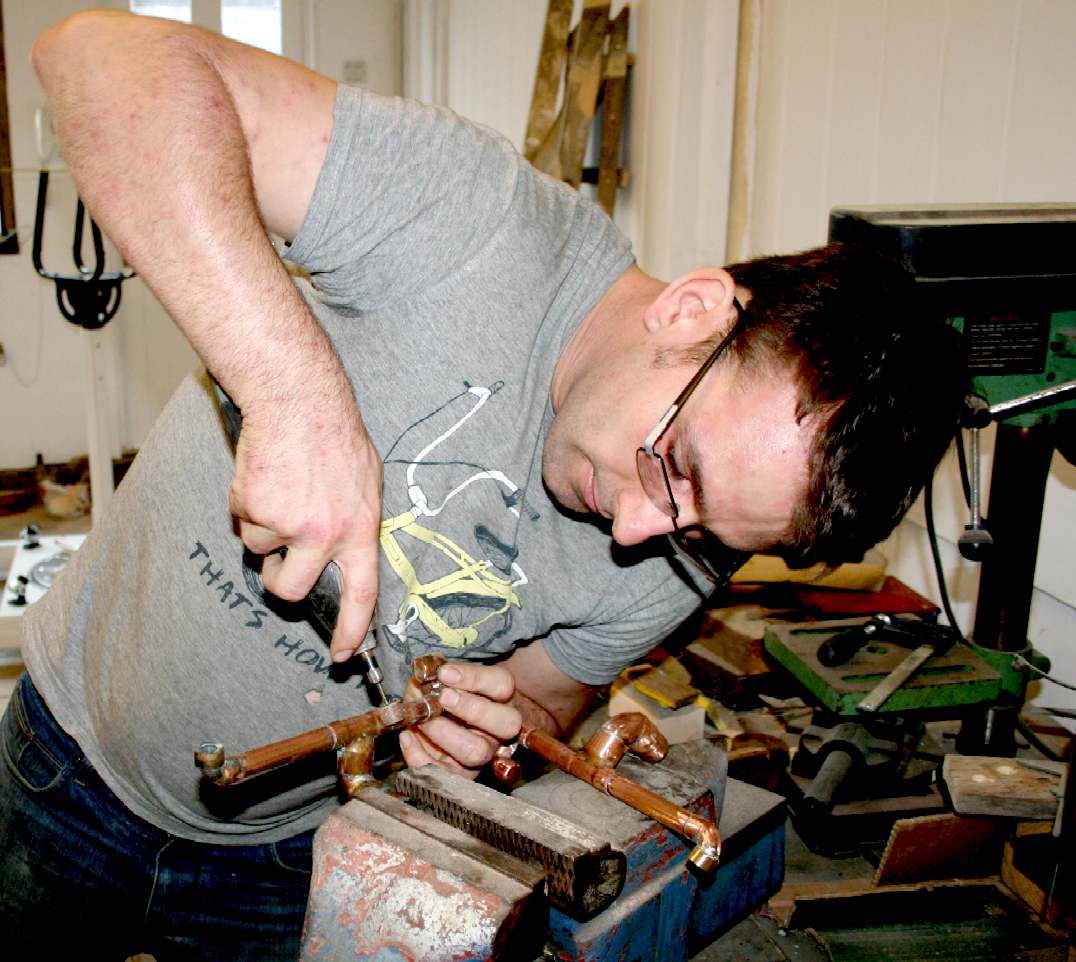
RECYCLE - Chris grinding an earlier weld flat. The old engine hoist was 40x40 and 50x50 mm box (hollow) section steel tubing - the mainstay of hundreds of industrial fabrications.
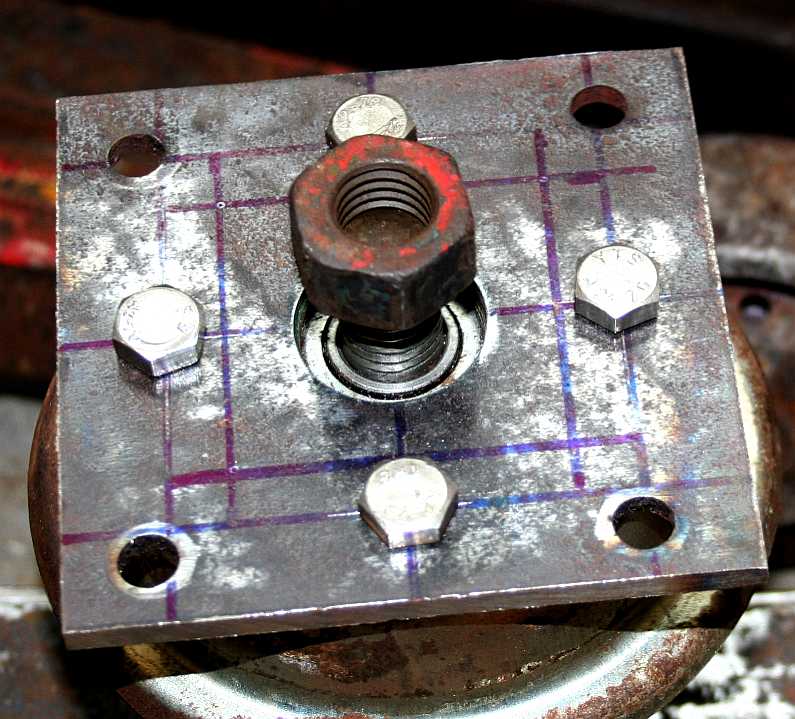
RECYCLE - Making the base mounting flange from 6mm steel plate. This has to be accurate so that the mast remains rigidly upright, but still able to rotate smoothly.
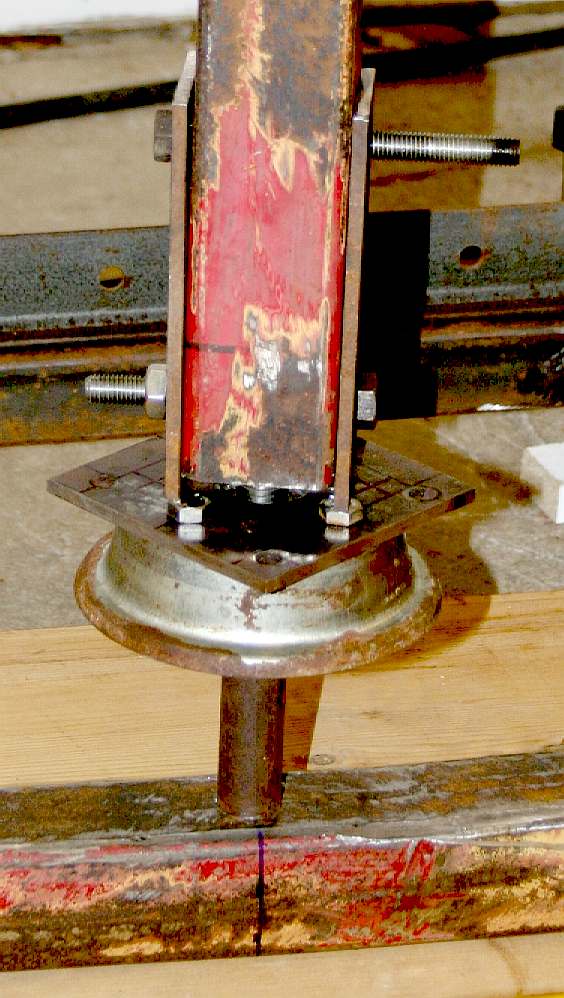
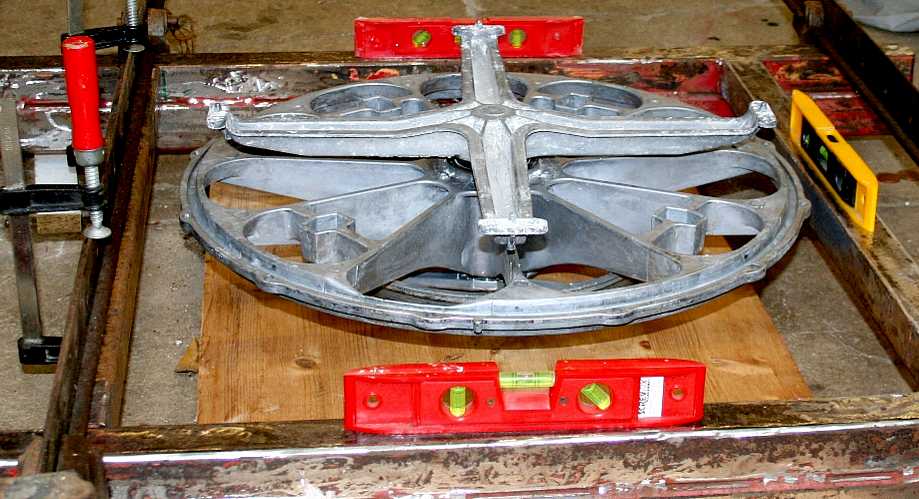
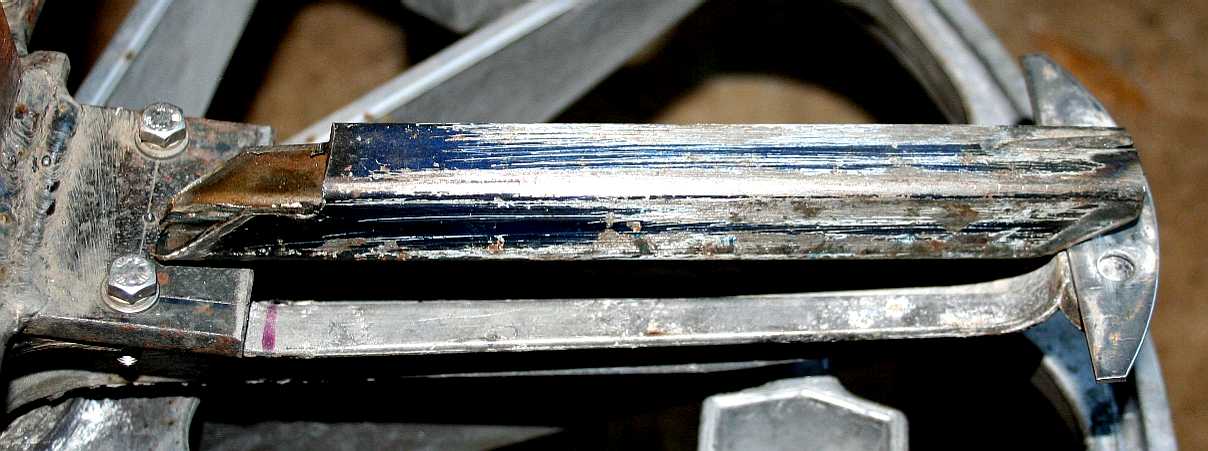
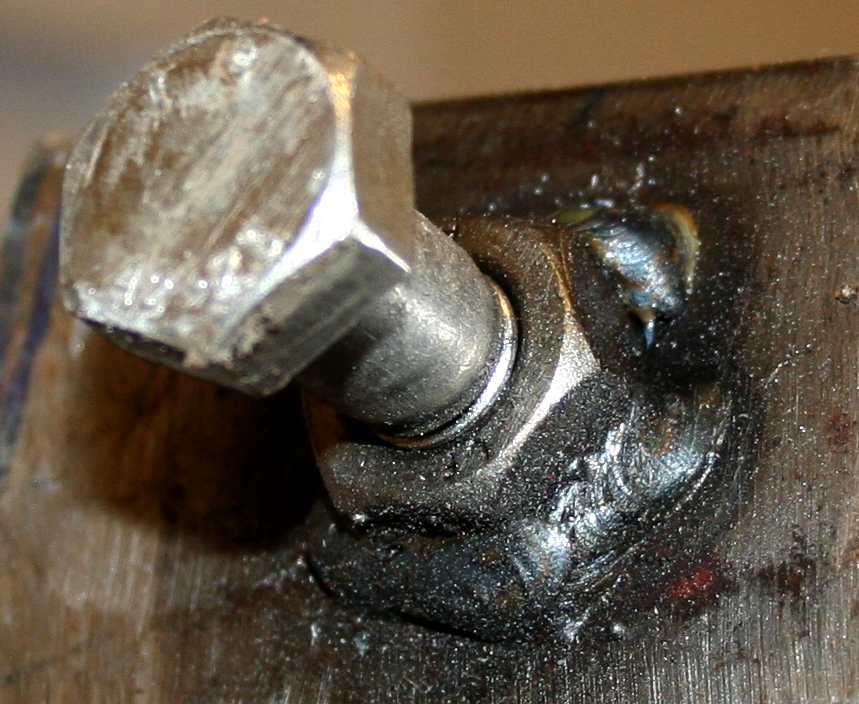
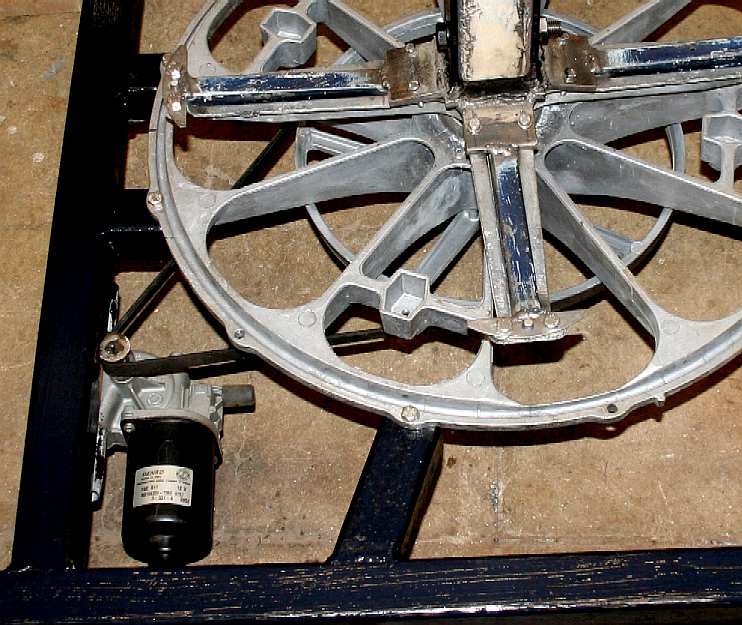
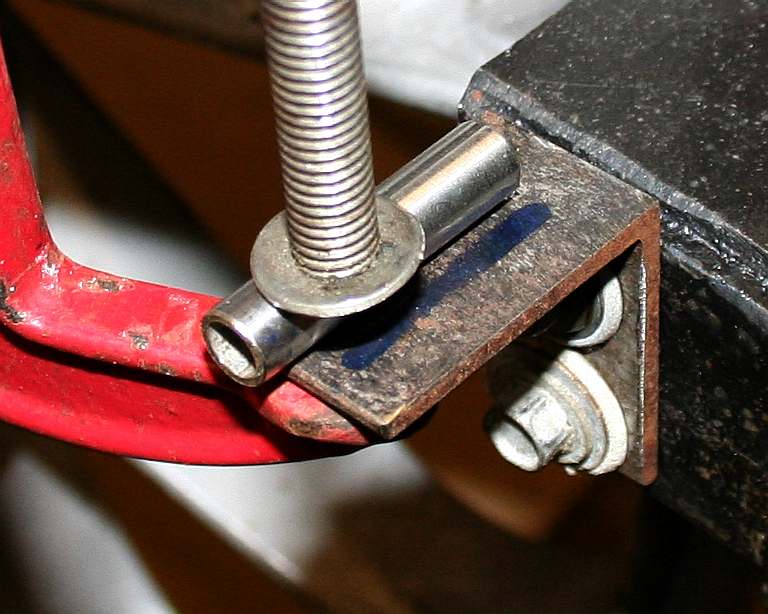
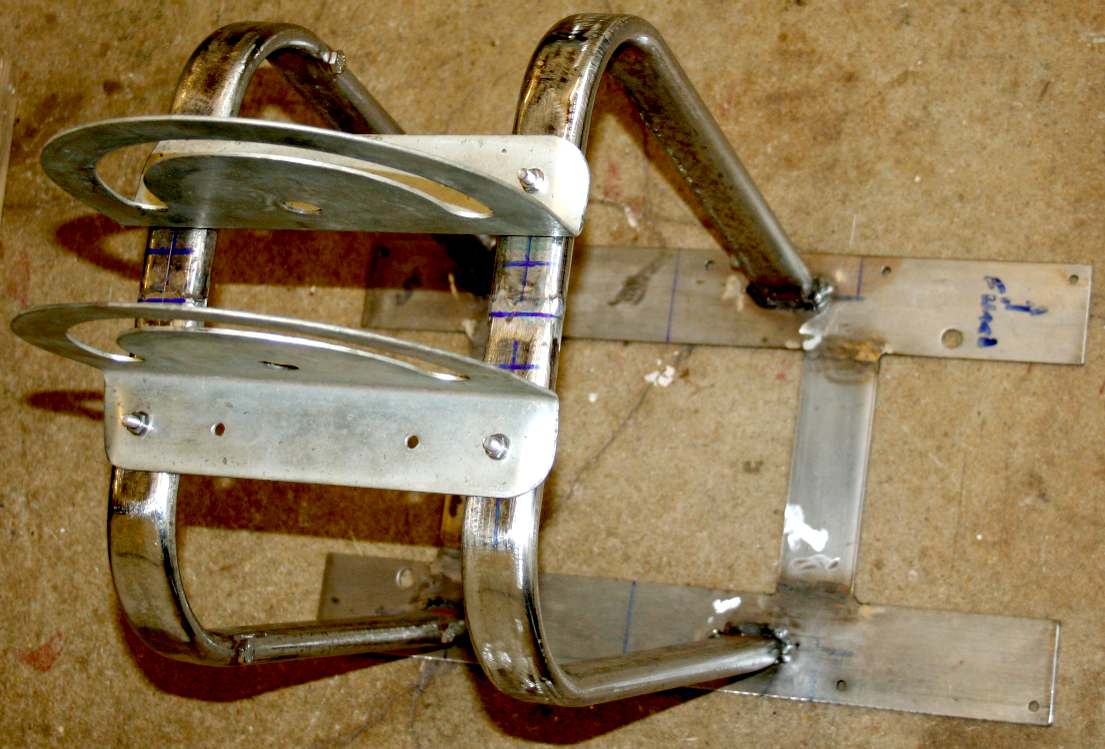
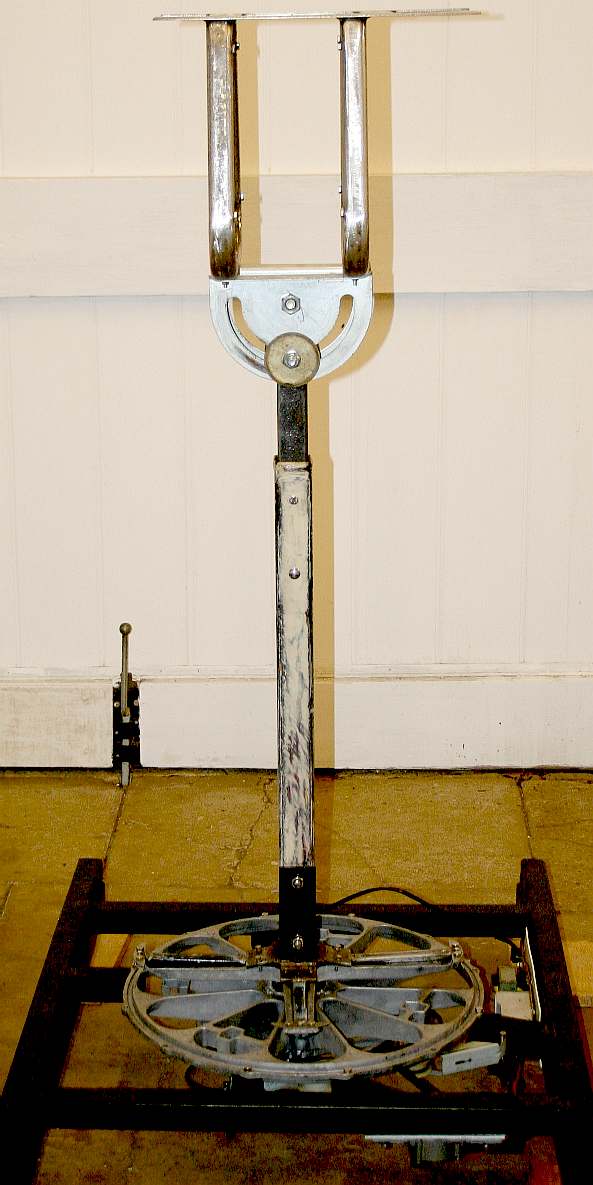
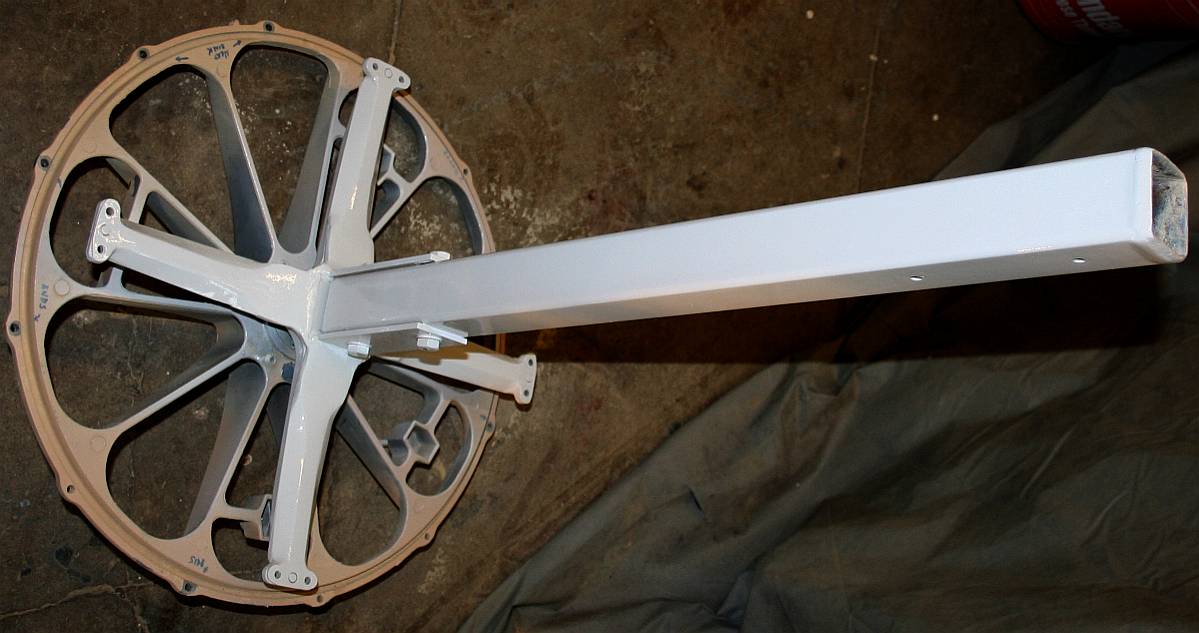
RECYCLE - Very neat. The mast upright of the show stand bolts into two upright plates (a fork) to clamp into position. The bearing assembly is very compact. No motor drive is shown here. A 22mm solid steel rod (high tensile) comes up from a 50x50mm beam that is bolted into the stand base frame. Having tried this hub bearing, we are not sure that it will do all we want in years to come. It has too much play, either because the bearing tolerances are not tight enough, or because the bearing spacing is not far enough apart - or a combination of the two.
RECYCLE - Another view of the mast bearing mount. Note that the steel beam is slightly curved. The steel spindle slots down a little further than shown here, so that the motor drive unit mounts conveniently in place. It does work, but we're looking for something smoother.
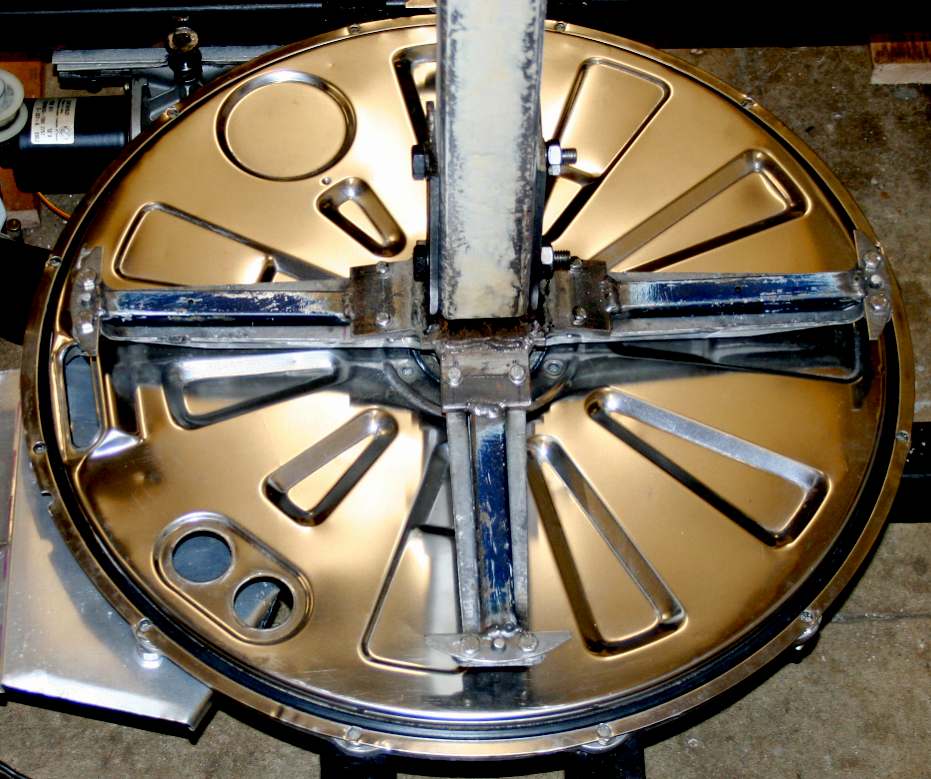
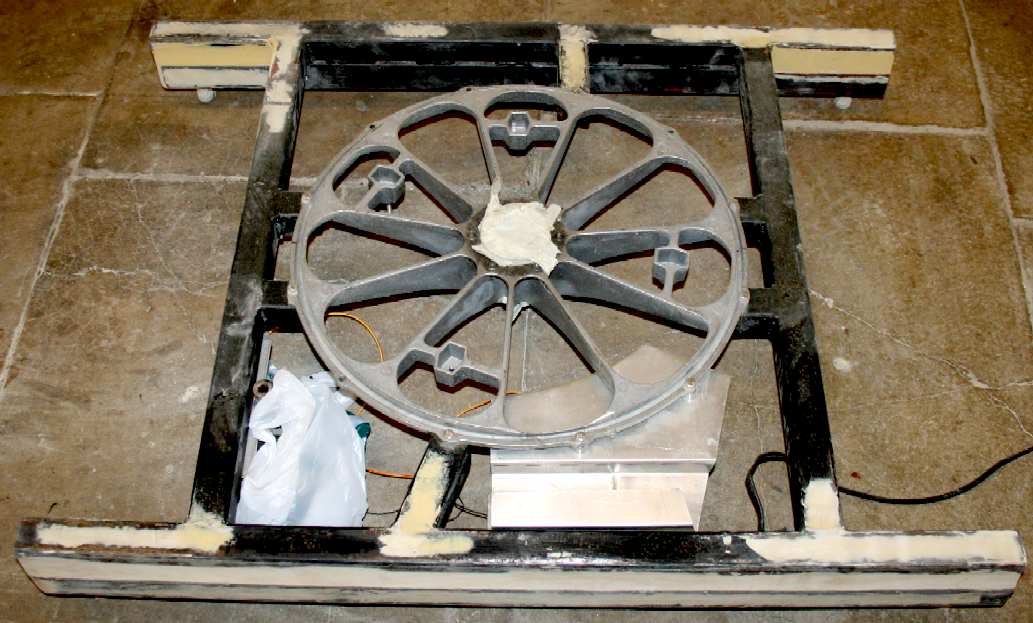
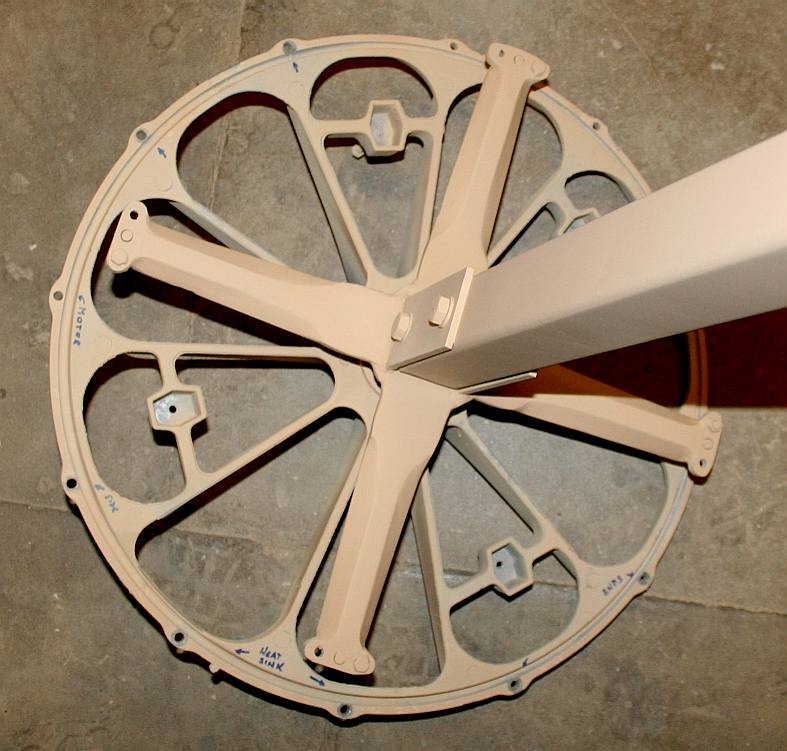
RECYCLE - The uprights are also made from 6mm steel plate. They will be welded to the mounting base flange. The high tensile 22mm solid steel rod shown above is sturdy enough, but we are thinking about beefing up the bearings from 36mm to 45 mm, with grease seals to allow prolonged storage between events - without needing attention. See the alloy spider mount below.
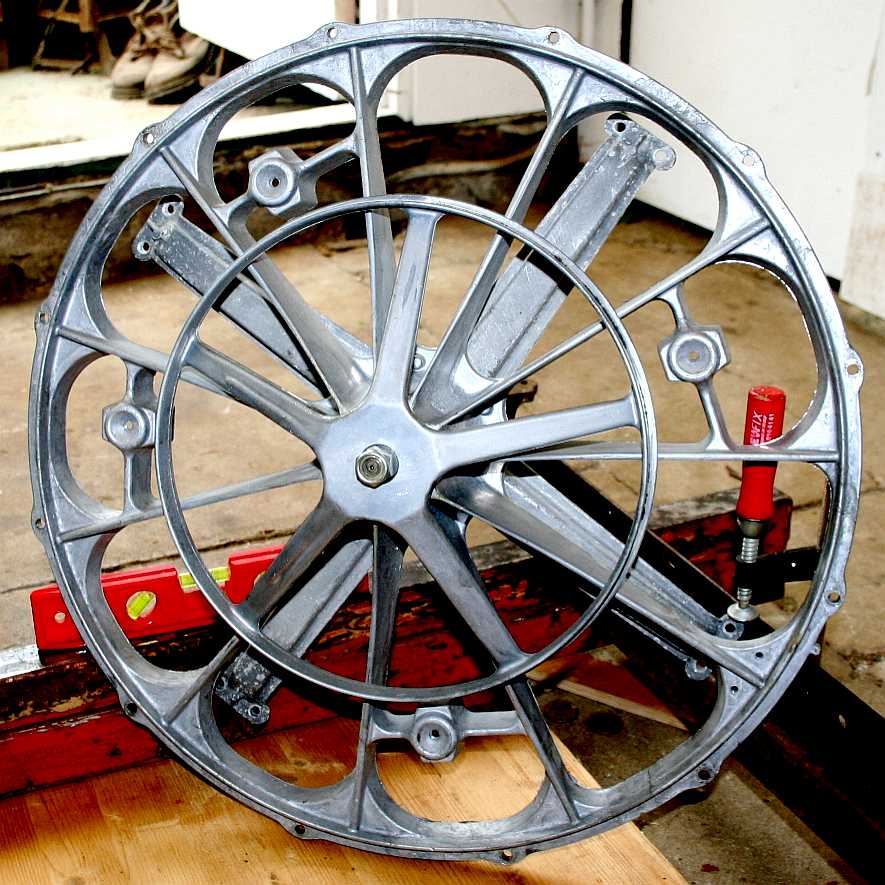
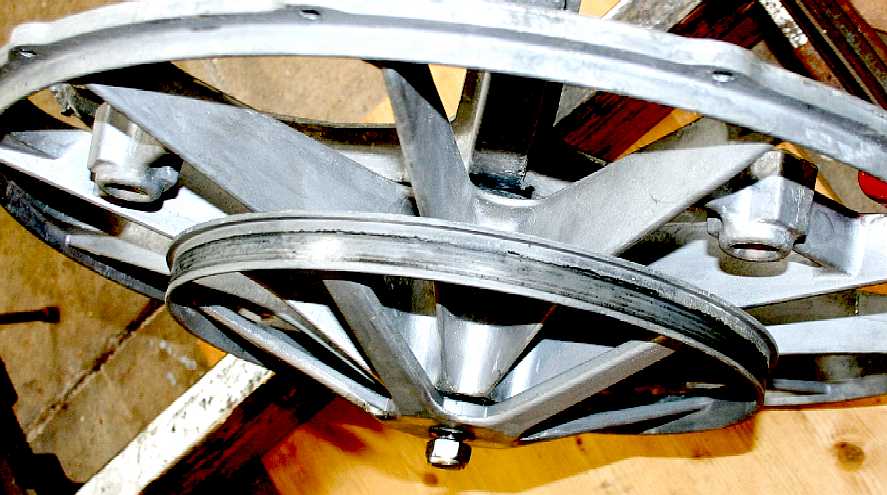
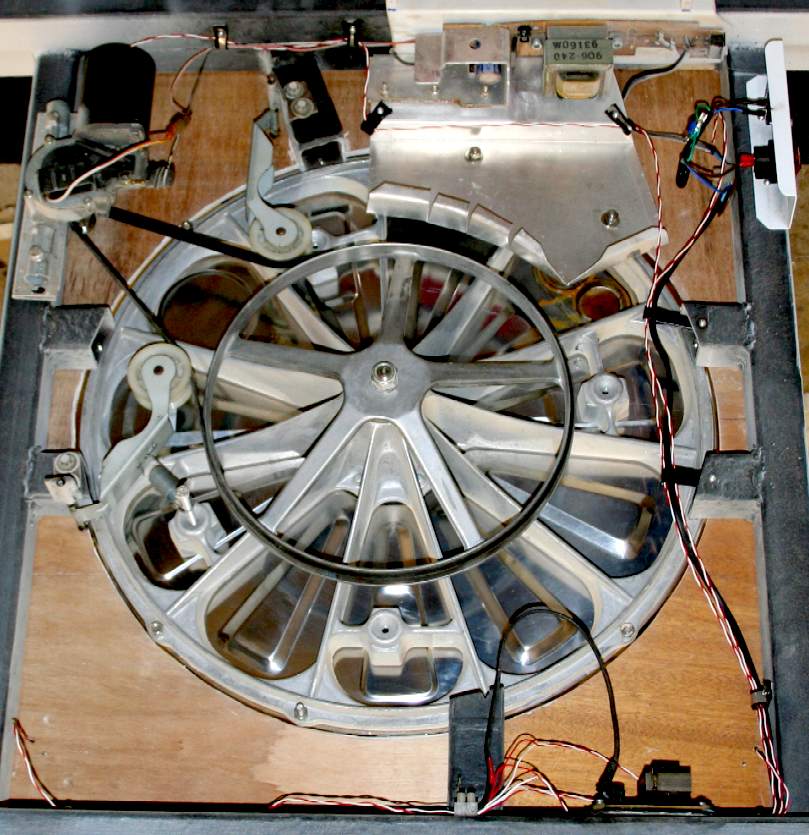
RECYCLE - The hub of this alloy (spider) casting contains two widely spaced 45mm bearings with shaft seals to hold the lubricating grease free from contaminants. A pulley wheel is attached to the end shaft on the underside, being ideal to mate with our electric motor and reduction box, via a belt that will allow clutching slippage. The clutching action is to prevent people being harmed should they walk into the display. The display will stop turning at the slightest touch - by design. A tension wheel will allow adjustment of the rotation torque.
RECYCLE - The mast mounting flange will bolt to the four pronged pedestal driver shaft seen above. The base spider casting will bolt to steel brackets (not seen here) on the stand base. The team will test out both designs before deciding on which to use for this exhibition stand. The reason for experimenting like this is because we are using this project to teach our newer team members (those who are not our engineers) fabrication and decision making on the hoof. There is nothing like a little practical hands-on work experience.
RECYCLE - The cast alloy pulley is precision machined to allow rotation speeds of up to 1500 revolutions per minute. We only need one or two rpm, meaning that the assembly is well and truly over engineered. It was this principle that underscored the success of Charles Rolls and Henry Royce when building their Rolls Royce motor cars, and that led to the Merlin engine, gas turbine engines for the 747 Jumbo Jet and shipbuilding.
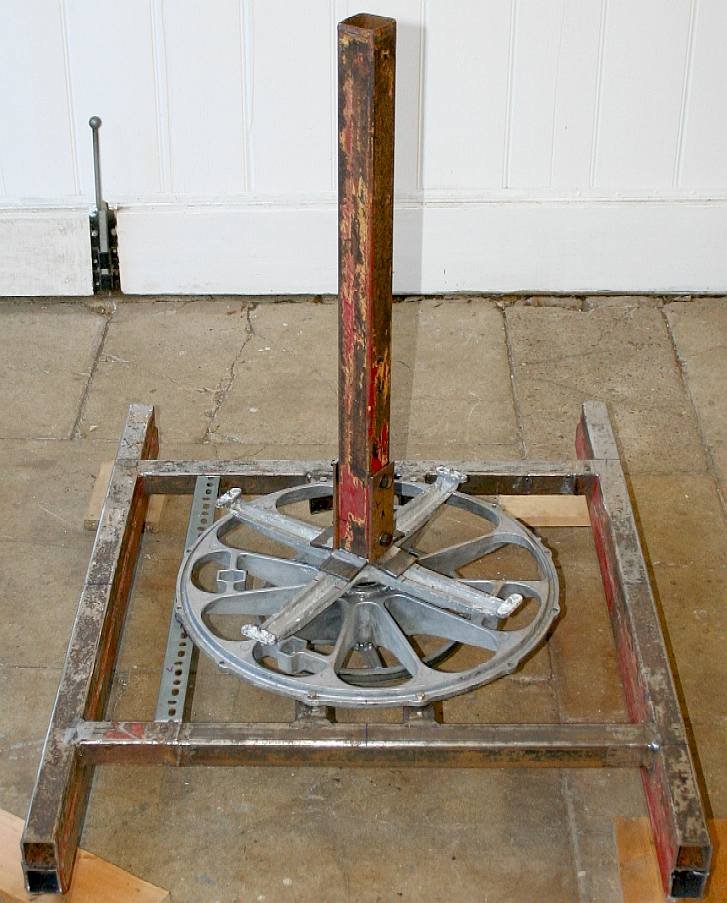
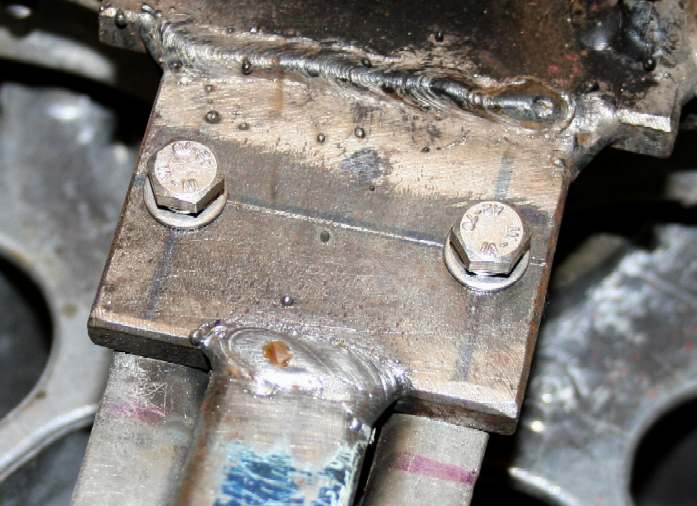
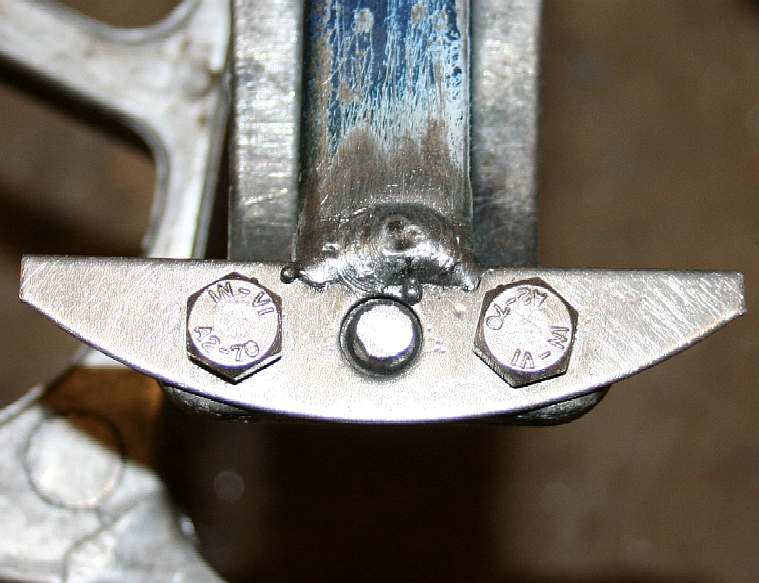
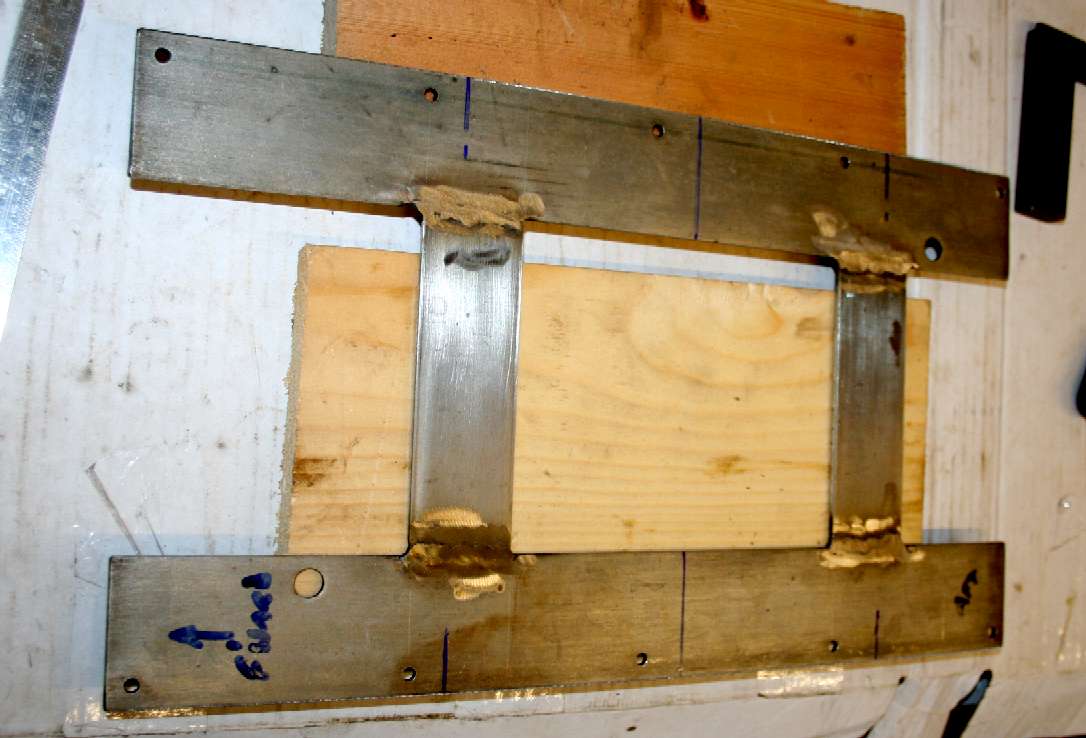
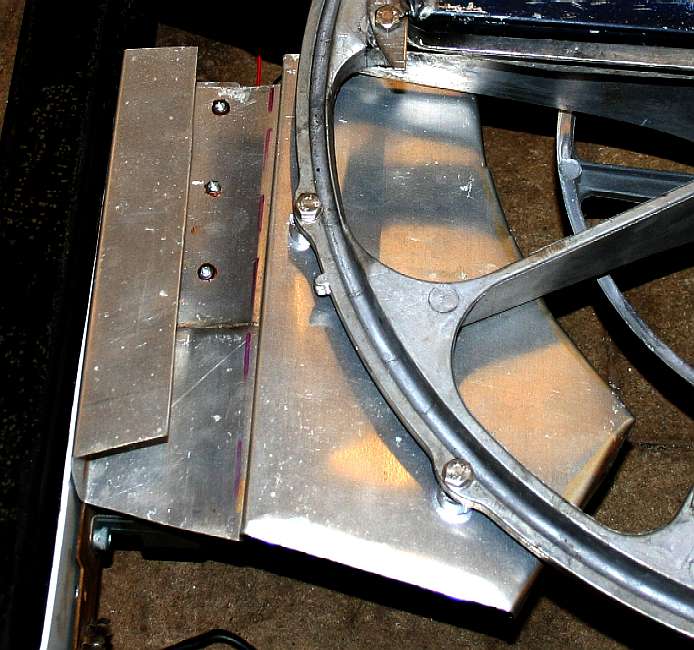
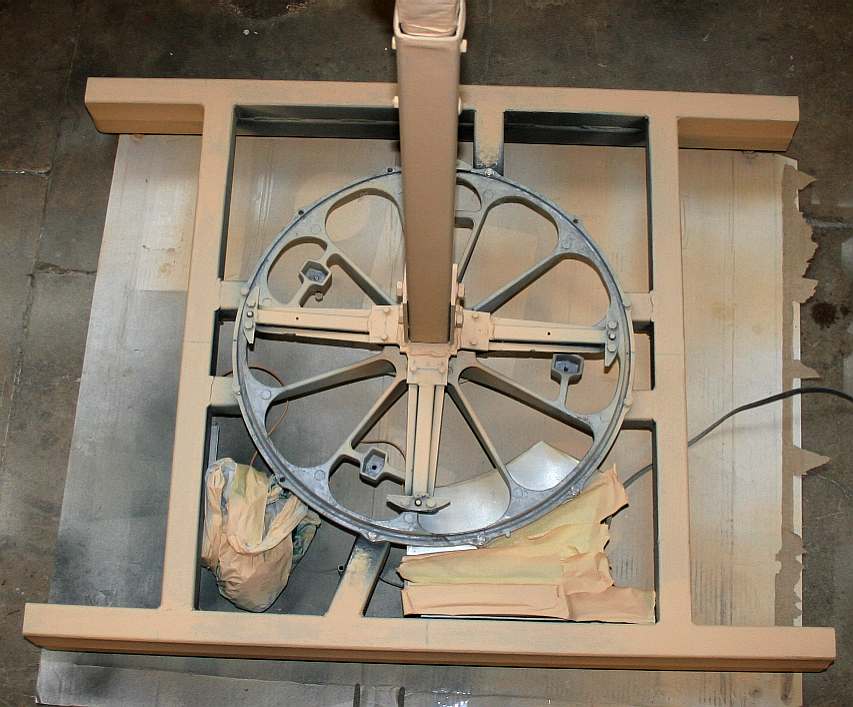
MOCK UP - Four steel lugs are to be welded in position and threaded to take 6mm bolts. They are positioned above to check tolerances. On the underside of the main floor frame we welded in heavy duty 13mm threads to take floor pads that are adjustable in height. This will allow us to set up quickly on uneven ground in the full knowledge that the SeaVax model is securely anchored to any showroom floor (if you'll pardon the pun).
RECYCLE - LEFT: Lug detail showing that the top weld is ground flat to allow for the deck cover plate, or flooring, to lay flat on top of the frame. RIGHT: Bearings and drive shaft with the pulley removed.
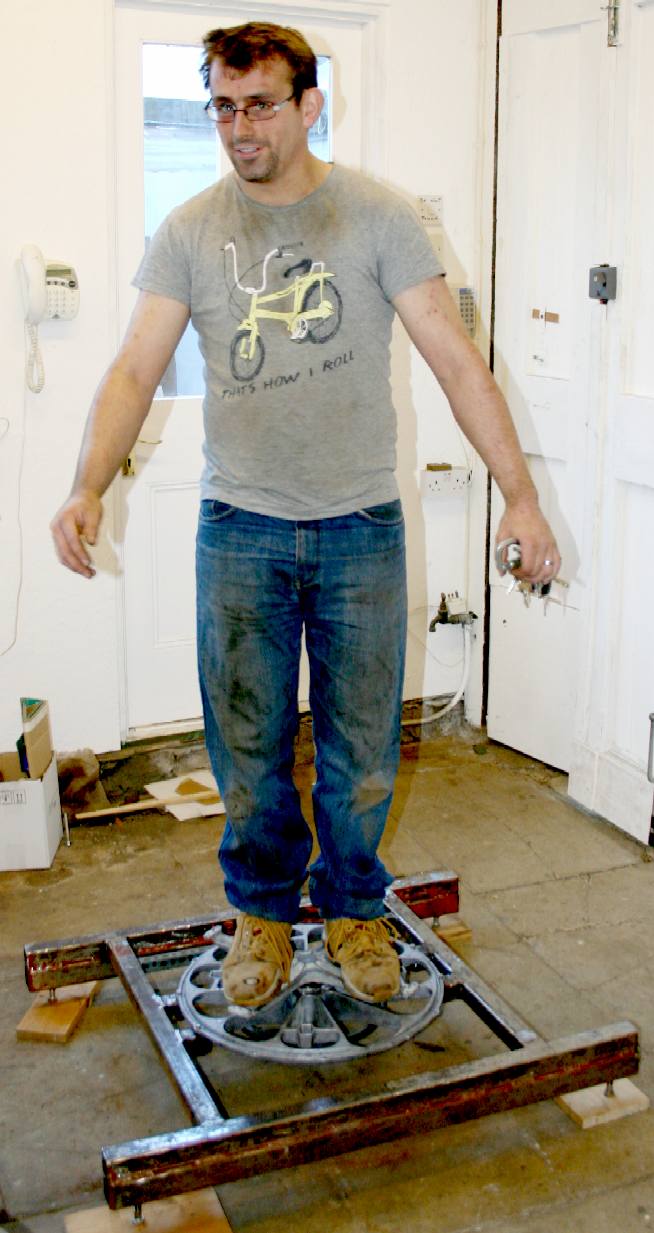
RECYCLE - Our project manager is not shy of getting his hands dirty. Having welded in a lug or two, and bolted the assembly tight, he gave the bearing a serious workout, by bouncing and swinging all his weight on the spider swivel mount. This did not phase the stand at all - and this was with only four mounts, when there will be another two at 180 degrees to the first, giving six in total to spread the loads when operational.
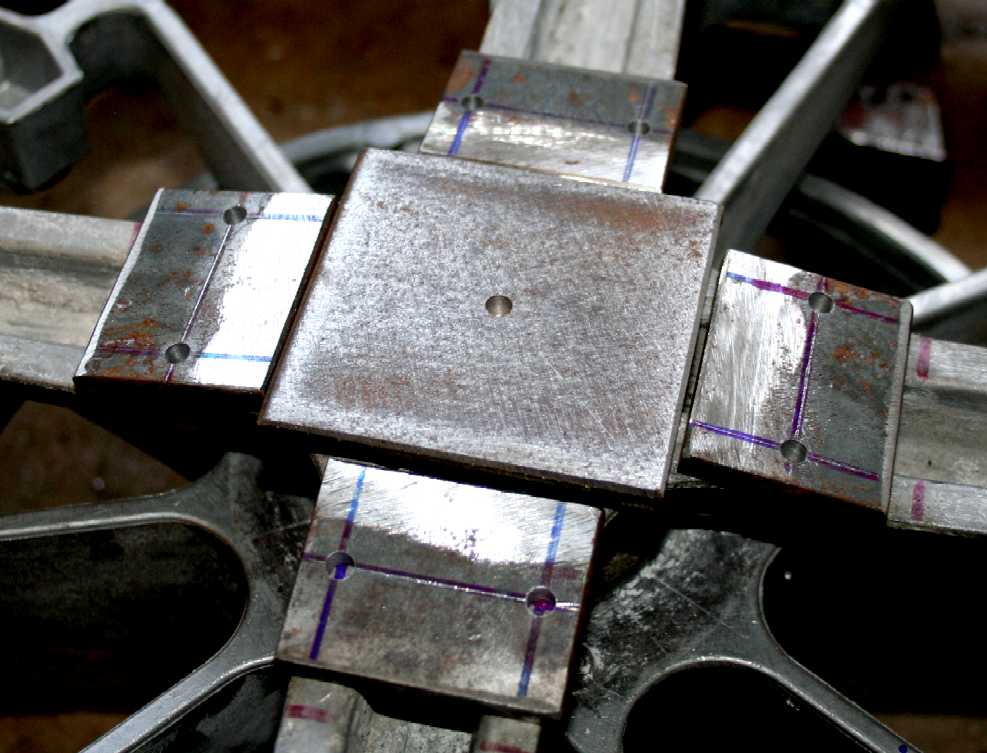
PEDESTAL FABRICATION - The four blank plates (cut by Richard, our logistics expert) are marked and drilled to form lugs that will be bolted to the alloy spider. A centre bolt fixes the most important (centre) plate in position. Being able to fabricate in steel or aluminium is vital in any research and development workshop. Fabrication involves high skill levels in marking out, cutting and welding. When welding thick section steel, grind 'V' angles to ensure weld penetration. We don't just want a pretty looking surface weld. 150 amps should do the job.
PEDESTAL WELDING - Is an art-form if you want to avoid distortion. You can see here that the four steel lugs are bolted to the alloy spider. Tacking is the first stage of the operation, turning quickly after each tack to complete the opposite weld. Check alignment after each pair of welds. The mast upright was fitted with magnetic spirit levels. The base was also fitted with spirit levels. The mast was spun after each welding operation to be sure it was upright. The steel and alloy needed to be cooled with water before the next welding operation. That is because we did not want to melt the rubber seals or cook the grease lubricating the heavy duty bearings.
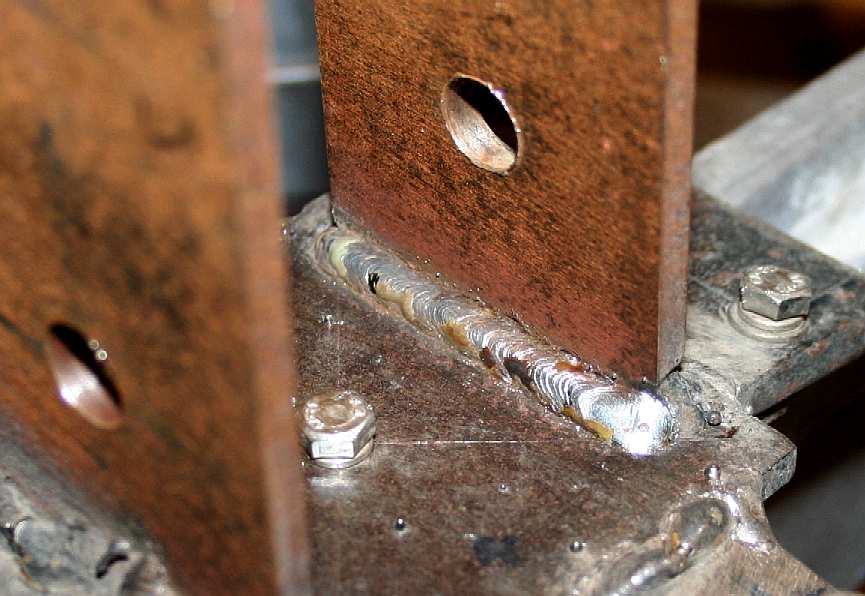
HAND MADE - With the outside welds completed the mast was removed to allow a bead of weld on the inner face of the upright clamps to the centre base plate. If the assembly does not spin vertically, correctly, after this stage - you are in trouble. You'll have to start again. If the correct weld sequence is used, you will be okay. There is no substitute for experience. Experiment on some scrap steel to perfect your technique. MIG welding induces less distortion than TIG or gas welding. Though TIG and gas welding give smoother welds.
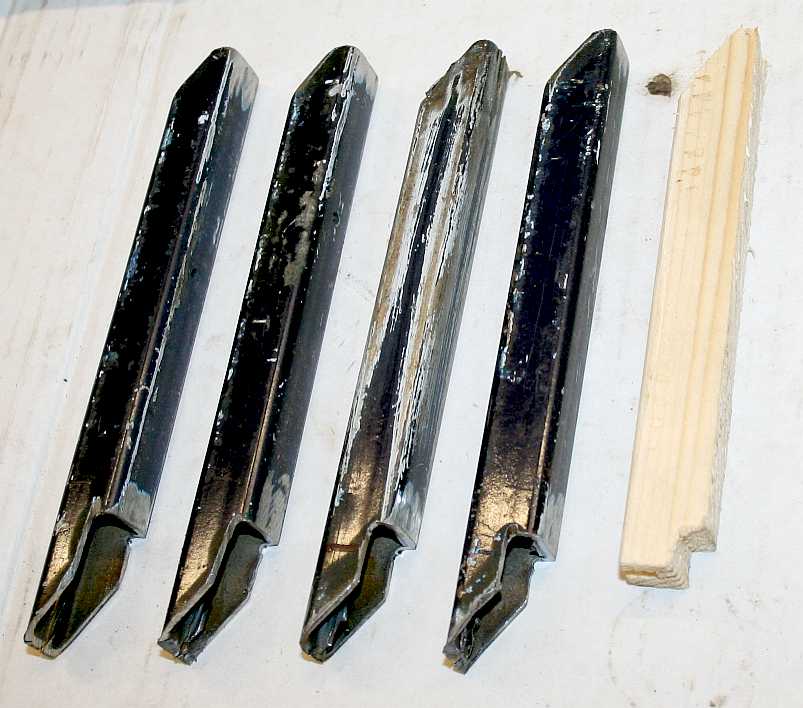
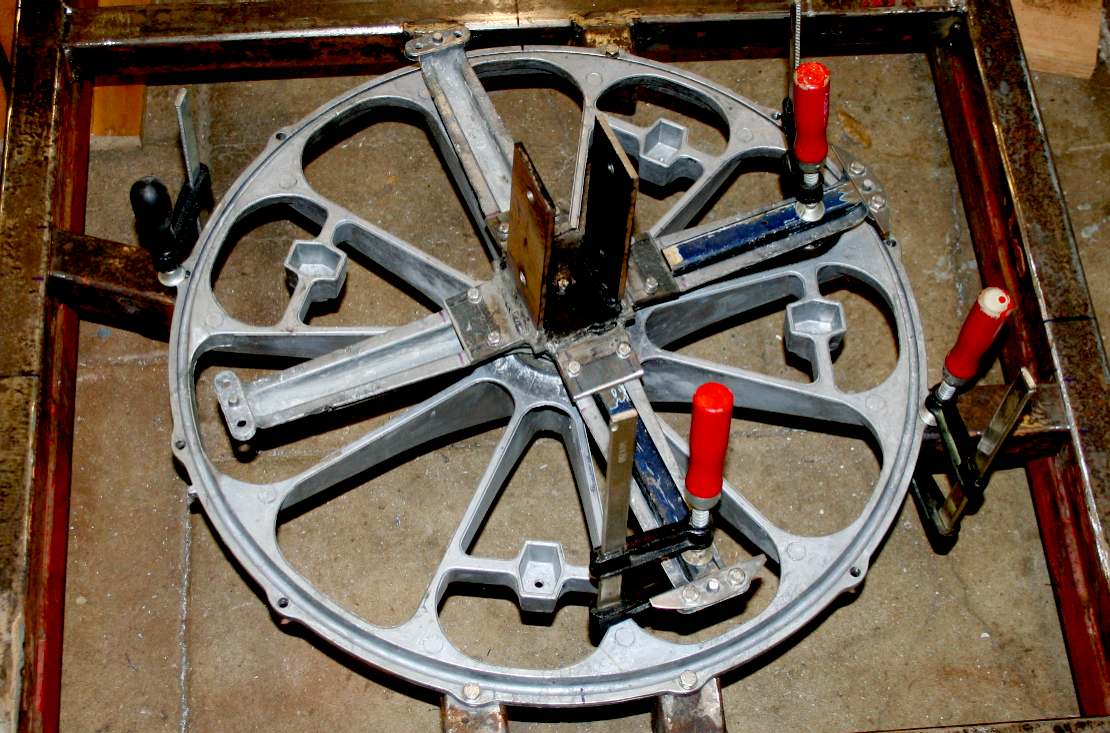
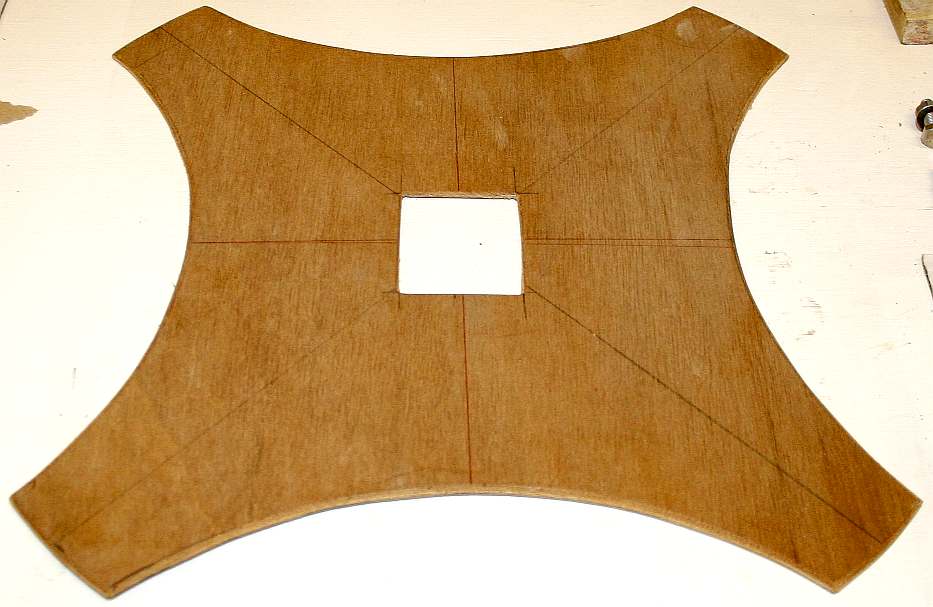
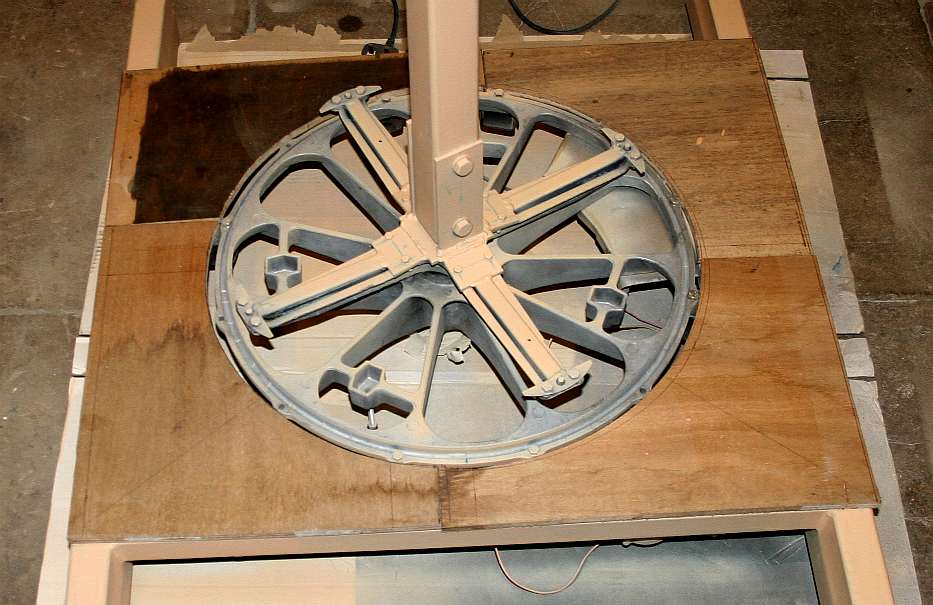
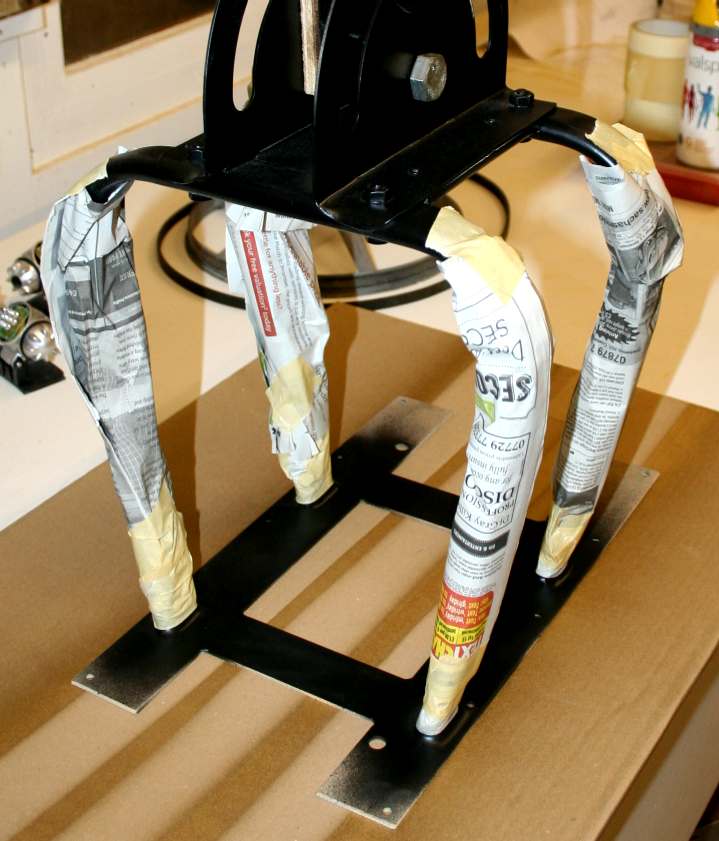
RADIANS - We now want to take the strain out to the end of the cast aluminium spider. These radians will also be the mounting for a rotating disc for a light display. Box section steel 20 x 20mm was used for the radians. They had to be cut to length and the ends cut to shape. A wooden pattern was used to get the angles right. The tricky part was cutting a 3mm groove in the underside of each radian.
PEDESTAL RADIANS - There are four radians, so the process had to be repeated four times. See the end detail on the right. The cut down the middle was to allow us to match the inner angle of the alloy spider. The radians then fitted snugly within the arms.
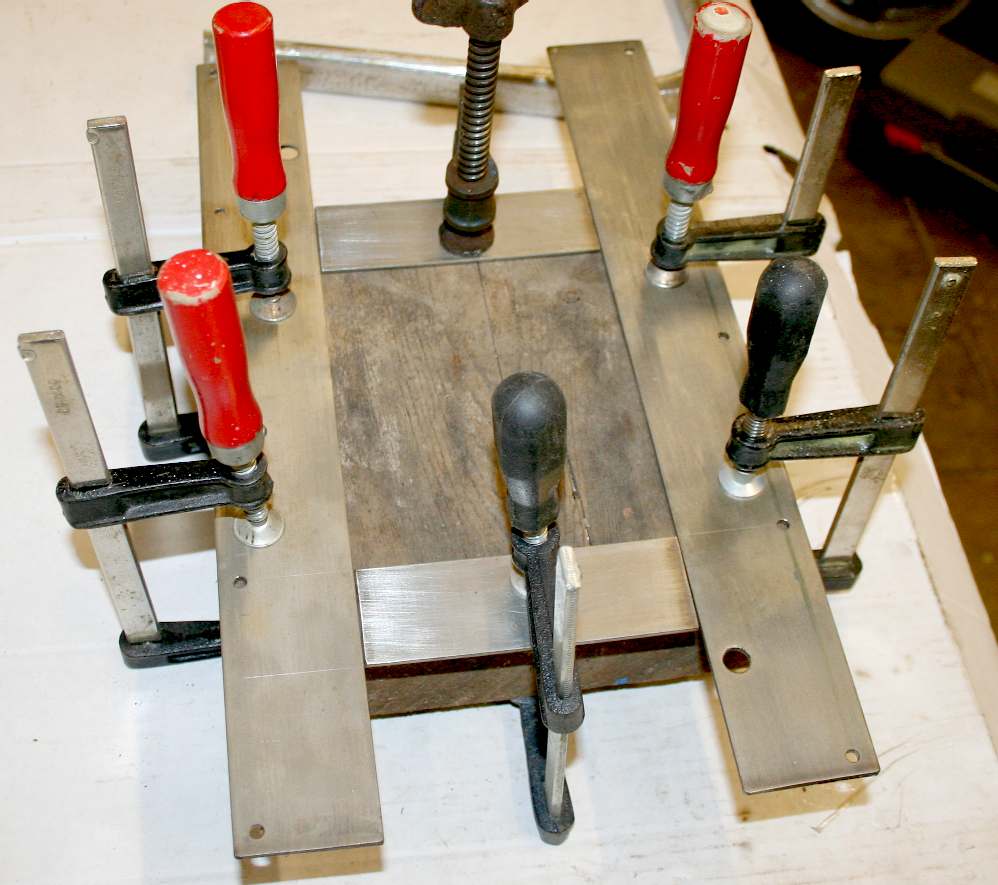
CLAMP IT - Fabricating intricate components means getting the parts just right, and then lining them up perfectly - and clamping them in place for welding. Leave a suitable gap when welding thick sections if you want to achieve full penetration. Note the bigger gap on the left for 6mm steel and a smaller gap on the right for 3mm steel.
MORE WELDING - Having made the parts fit so well, all that remains is to weld them in place. We want full penetration without melting the aluminum spider underneath. You can see from the pictures above that we managed it. We did not change the welding settings, the operator just adjusted his welding speed. Concentration is needed for each weld. Make sure you are comfortable when welding, or your focus will wander.
MERRY GO ROUND - It looks for all the world like some kind of fun fair attraction at this stage. You will not be able to see the alloy spider once the stainless steel cover is fitted. The frame will also be covered in, to prevent the inquisitive public from trapping their fingers.
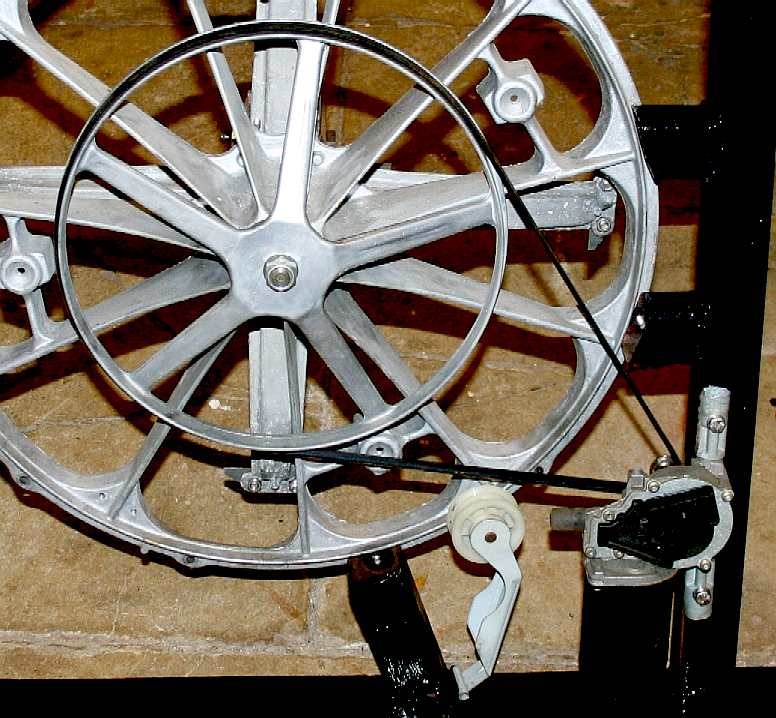
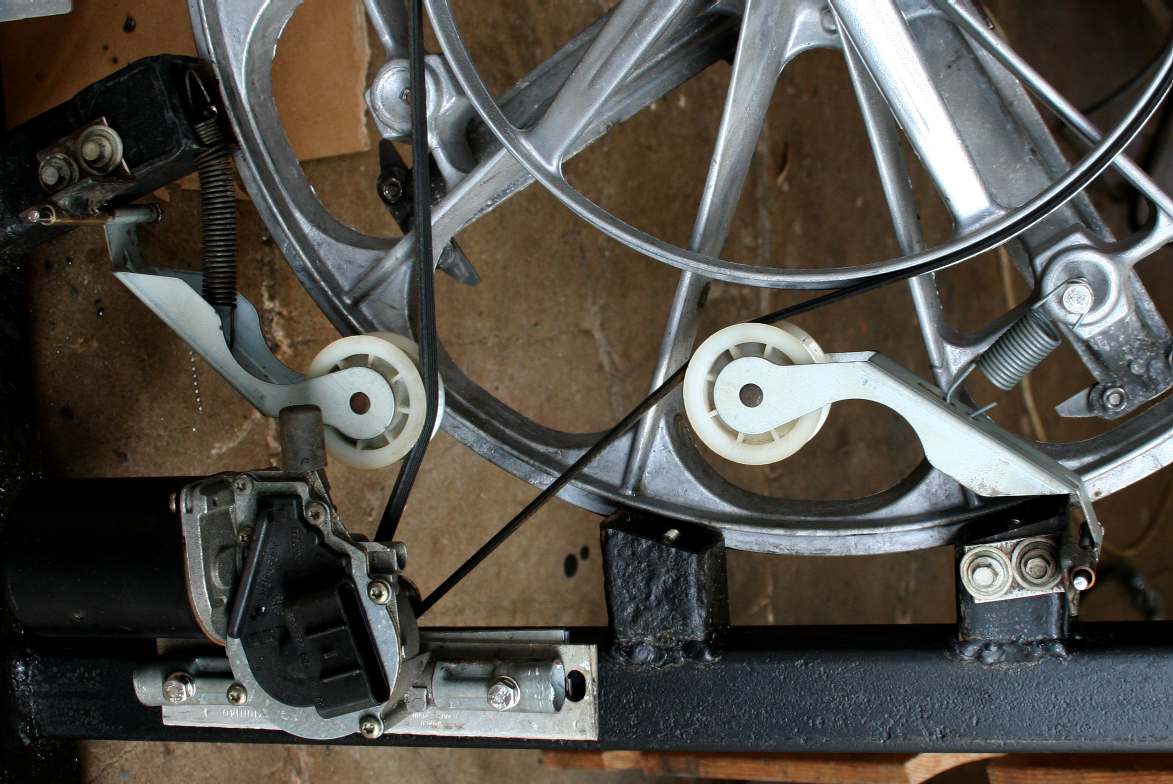
DETAILS - LEFT: Adjustable feet - a chunky nut was welded to each corner with the bolt head let into a load spreading foot (not shown). RIGHT: The motor driven pulley (capstan). Normally a small drive pulley like this would be grooved to mate with the rubber drive belt, so increasing friction area. We want to keep drive traction to lower levels to provide safety clutching, so have not machined in the V grooves, but have a rim like on a cotton-reel, to keep the belt aligned when horizontal. These belts normally operate vertically.
DRIVE BELT - A small two-speed electric motor and reduction gearbox are used, in this case a windscreen wiper motor that is being recycled. This is the view from under the stand. Note the nylon tensioner/follower pulley wheel, not yet fitted. There will be two of these on either side of the drive pulley to give us precise control of belt tension. Springs will be used to apply the required tensive force. Once you have the base engineering sorted, you can add all kinds of gizmos. Compare the Ford Model T with a modern Ford Focus. The basic design is the same: an IC engine driving two road wheels. But the electronics onboard even this everyday car, take the basic concept to a new level. We could have a field day jazzing up this stand with sensors, voice or heat activated messages, following passers by interactively. Even a powered tilt head. You name it, electronics can do it. No time unfortunately - and the robot boat is the attraction not the stand - a concept vessel brim full of electronics and innovative design.
MOTOR POSITION - Seen here from above, the motor drive is neatly tucked into one corner. A decorative cover will protect the motor and belt drive. It could not be more simple - our motto: KISS. We may use a heat-sink rather than a cooling fan for this stand, to keep the noise levels down. The stand will be run for 48 hours while monitoring the temperature - just to be sure nothing is strained. It is more likely to be the power pack that causes heat build up. We have tested a step down transformer unit that will fit nicely, but not yet run it for any length of time. Correct alignment of the belt and pulleys is essential.
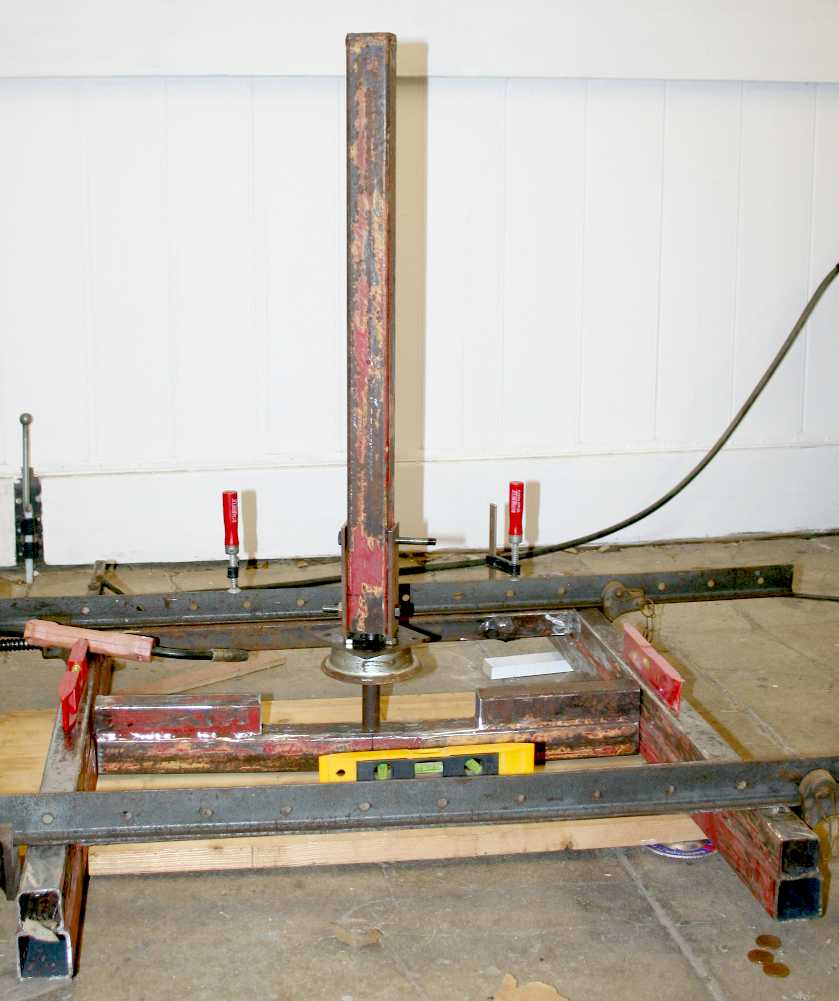
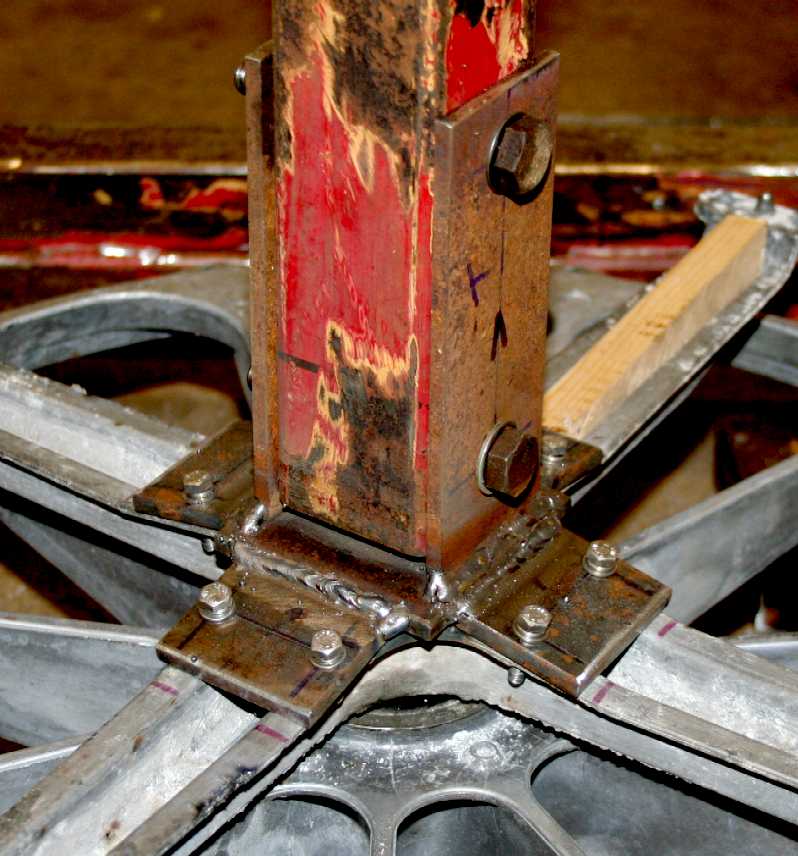
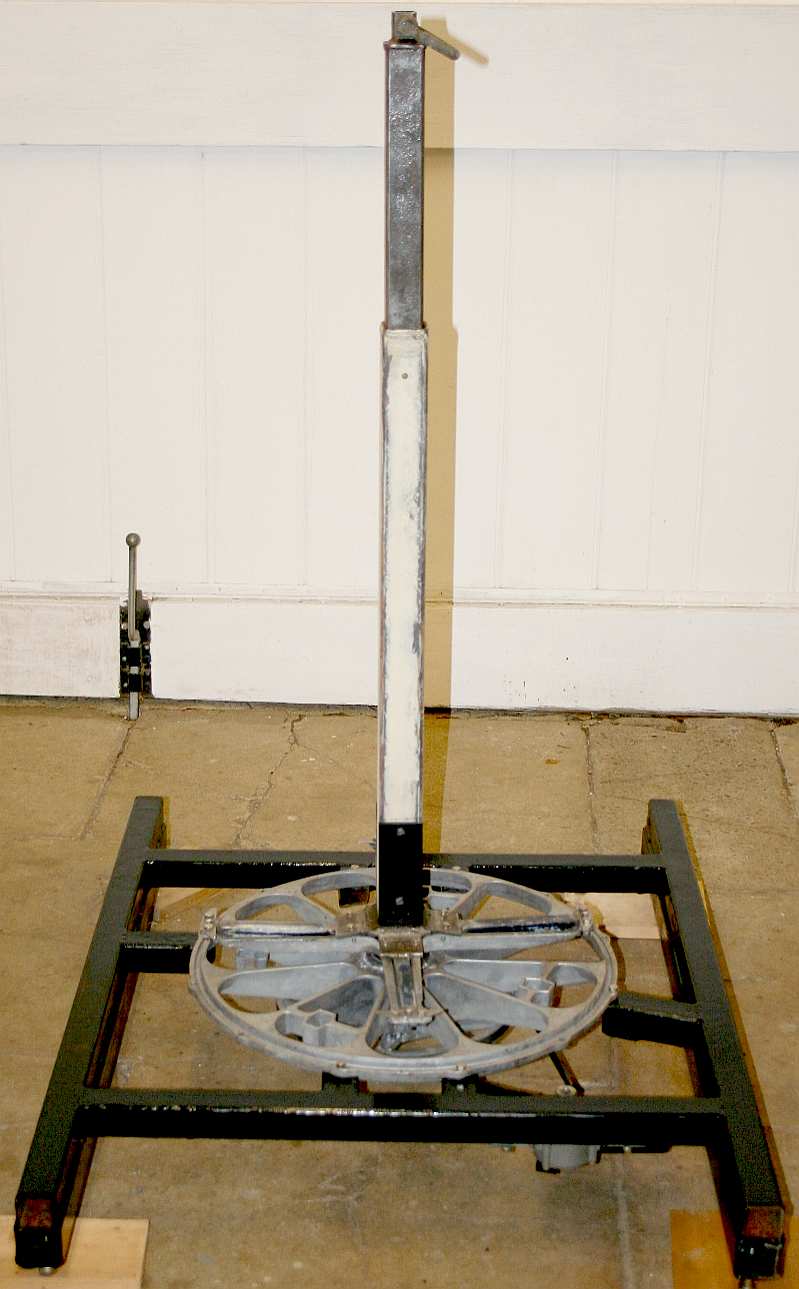
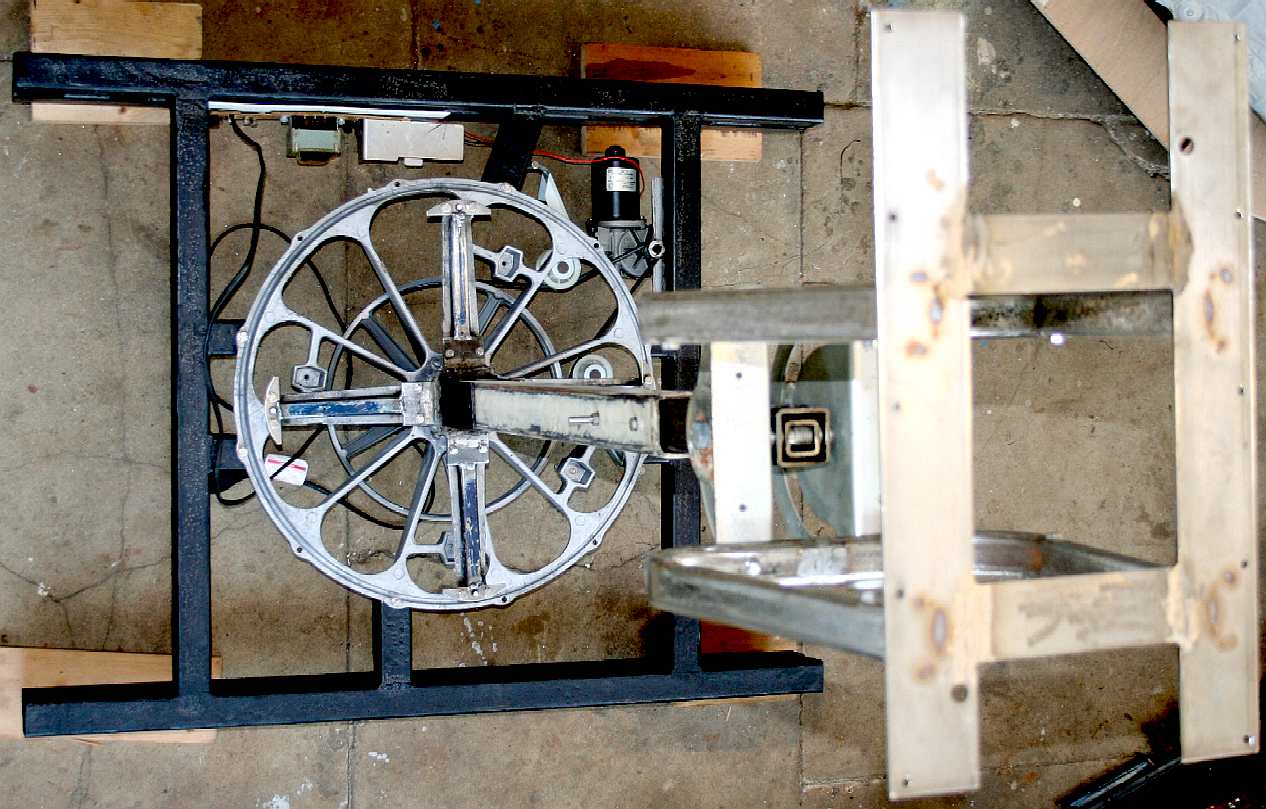
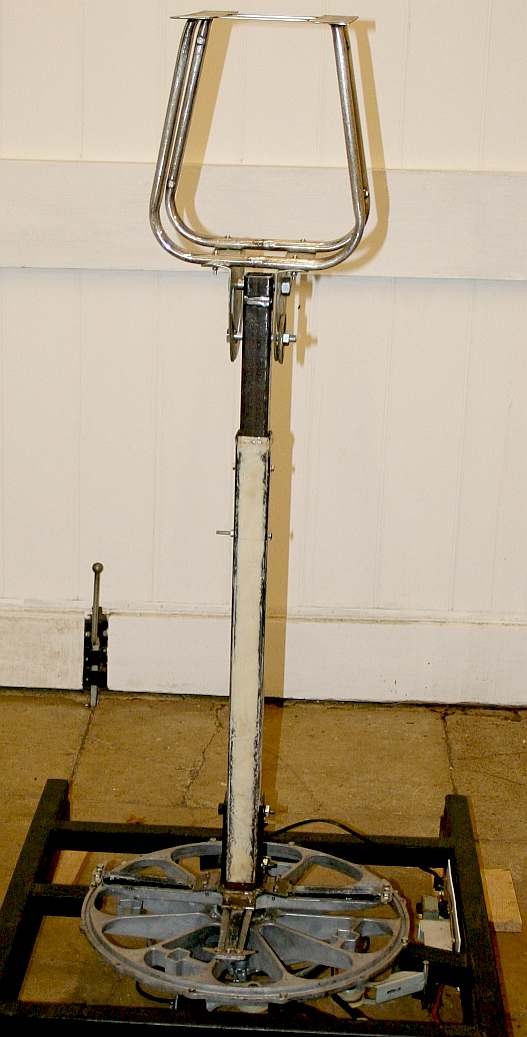
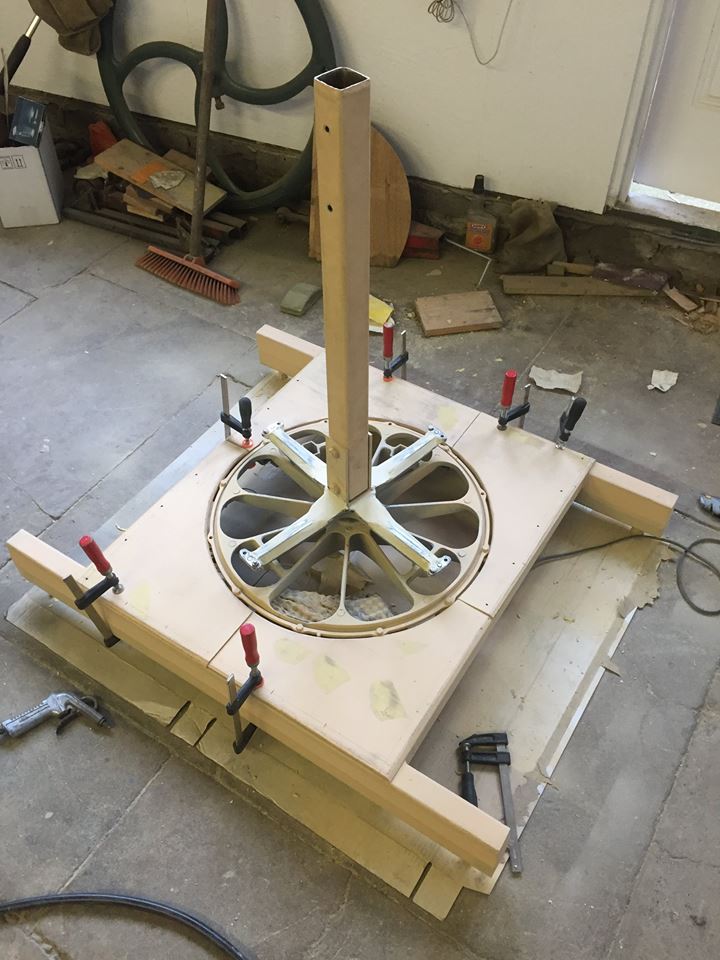
GETTING TALLER - [Left] The steel column is seen here with the extendable inner slotted in place. The ability to adjust the height is useful in different locations where height restrictions may apply. The heavy section steel and relatively wide footing makes this stand difficult to overturn. That of course was one of the most important design parameters: stability. The pedestal to column coupling reminds us of the swash drive on the famous Volkswagen Beetle rear axle. If it was good enough for Professor Porsche, it's good enough for us. Interestingly, Ferdinand Porsche was famous for battery electric vehicle before his air cooled boxer engine for the people's car. He also used two front hub mounted wheel-motors in the 14 horsepower 1889 Lohner-Porsche. He followed this up with a four-wheel drive version that also had an IC generator onboard to give us the first electric/petrol hybrid car. Now that is some serious innovation. Porsche would have attended exhibitions like Innovate2015. Does the stand remind you of anything?
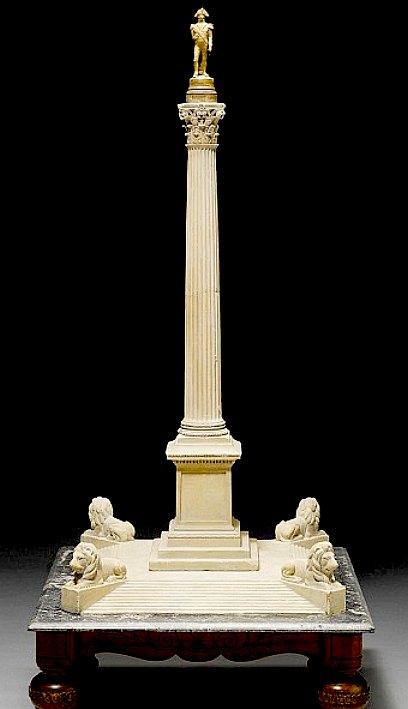
SCALE MODEL - [Right] A 1:50-scale stone model of Nelson's column, made by William Railton (Auctioned at Bonhams Nov 2010), shows he had wanted a magnificent edifice - 200ft tall, standing on a high, stepped pedestal, guarded by four enormous, stone lions. But the finished column was 30ft shorter because of budget cuts, and initially, there was not a lion to be seen. Angry at what he saw as the emasculation of his design, Railton refused to attend the official unveiling at Trafalgar Square in London in 1853 - and who can blame him.
IDLERS - These are ordinary tensioner assemblies as used in many domestic tumble driers. The same width and ribbed 'V' section rubber belts are used in these driers, only they are about twice the length. Isn't standardization wonderful. That of course means that the pulleys are the correct width. Nylon is used for the injection moulded wheels, that have sintered bronze bushes running on superbly machined steel pins. The porous bronze bushes holds enough lubricating oil for the life on these machines.
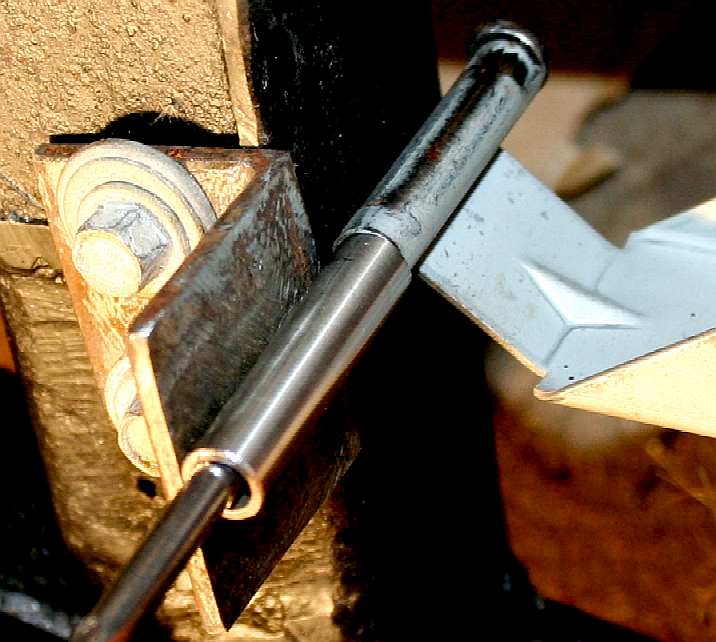
TENSION - The mounting brackets for the spring loaded idler wheel that tension the ribbed rubber drive belt. To save time we used proprietary self tapping screws for these mountings. A steel tube is welded to the brackets and a pin drops in from above - here simulated by a 3" nail - that is unfortunately, too small in diameter to use. Dag-nabit. The steel tubes are shown here jigged, ready to be welded to their respective brackets. We'll be using around 70 amps for these welds, so as not to penetrate the thinner wall tubing. Weld from the angle to the tube with the weld pool, not the other way around.
TENSIONERS - The completed assembly working nicely. Now all we need is a couple of split pins and some lubrication for the hinges.
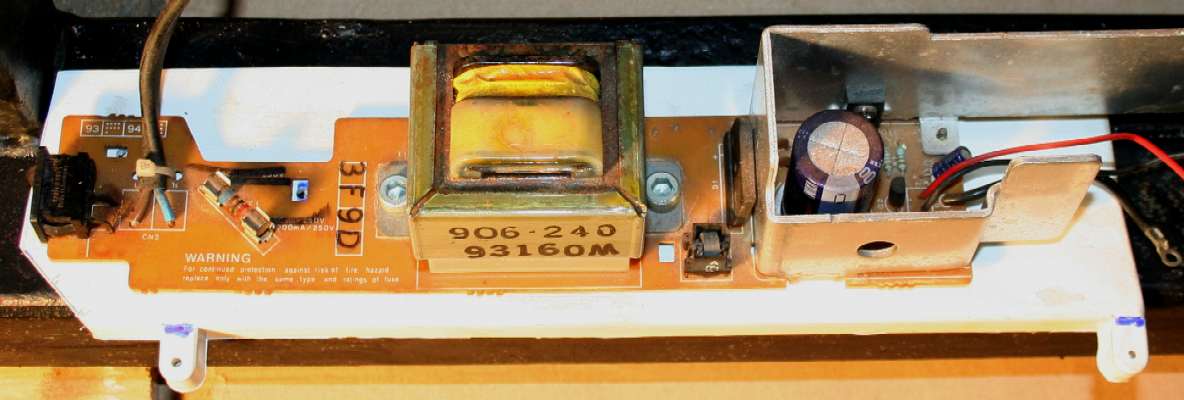
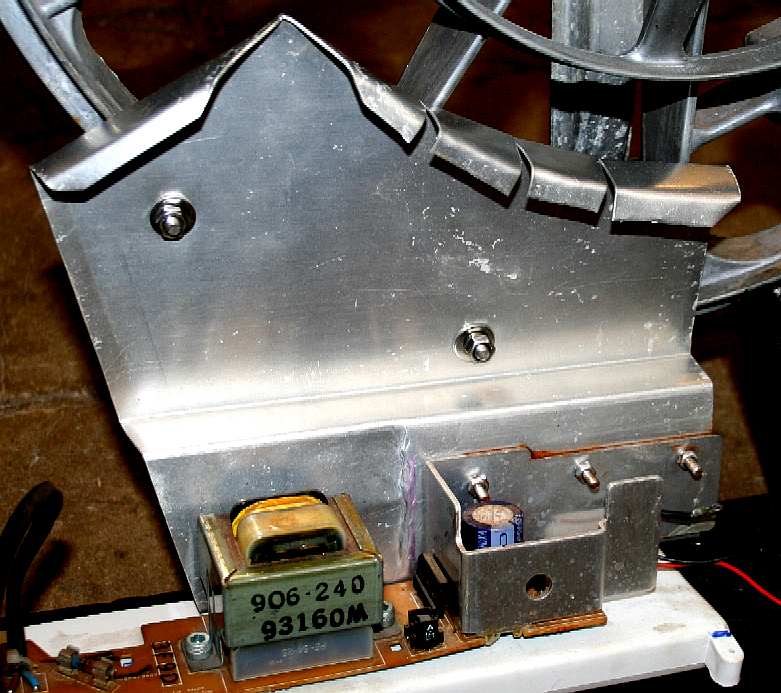
POWER - This is a 400 watt step down transformer PCB scavenged from an old stereo system, providing 5 and 12 volt outputs. The rectifier chip and smoothing capacitors are seen to the right of the transformer. If at a later date we decide to have speaker interaction and infra-red or other motion detectors for human recognition, or tracking, we have the power source to cope - when the stand will become a sort-of robotic interactive display (not for this show). The unit was bolted to the underside of the main steel frame, with an insulating plastic divider, The in-line layout is perfect for this installation. A steel shield will cover the entire unit with additional heat sinks added to dissipate any build up from constant operation. There is a convenient on/off switch that can be located when in use by anyone who knows where to feel, and a 3 amp safety fuse in the circuit. Provision will be made to mount Arduino and Raspberry Pi boards. This display stand may one day form part of a permanent exhibition in Eastbourne, so will need to be both robust and reliable.
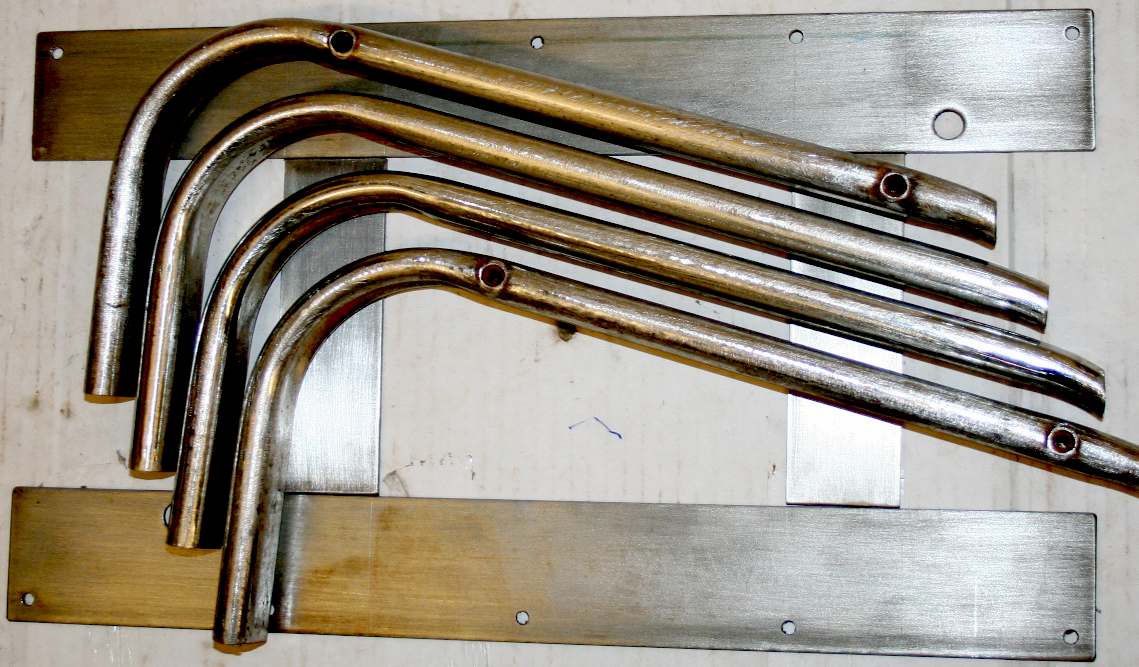
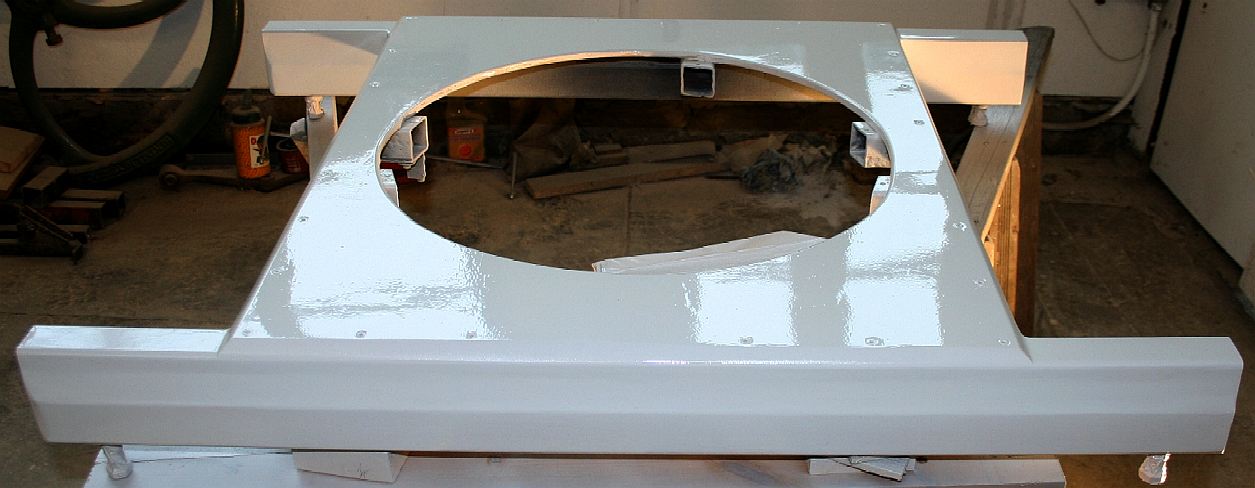
CRADLE & MOUNTING BASE PLATE - This was the cutting list for October 5th. The flat plate is stainless steel, which can be a problem to drill if you don't use sufficient cutting fluid and have sharp drills. 10 holes were drilled accurately so that the model can be mounted fore and aft in increments of 95mm. 20 holes would have given 47.5mm adjustment options, but taken longer to make. The two cradle frames are made from old office chairs. The steel is surprisingly high quality seamless oval section.
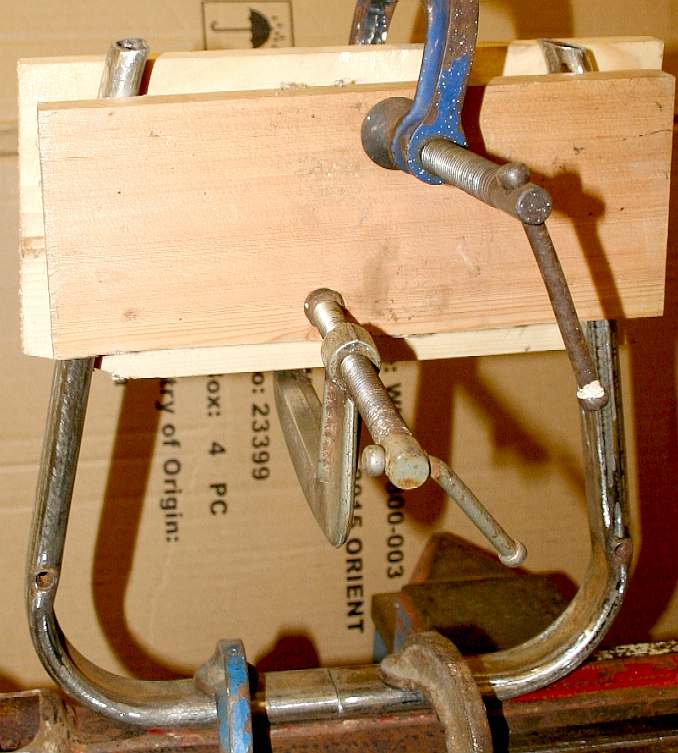
BASE PLATE CLAMPING - Having marked out the plates with a scribe and beveled the stainless steel ends to remove sharp edges and ensure weld penetration, carefully line the frame up and clamp to a sturdy flat object. Normally this would be steel, but here we've used a chunky piece of wood. Even with this simple frame, weld sequence is important to prevent distortion. We will tack weld in the 8 corners first, then weld the flats together - again in a sequence to minimize distortion. Work quickly when undoing the clamps and re-clamping for the reverse welds. Check for distortion at each stage.
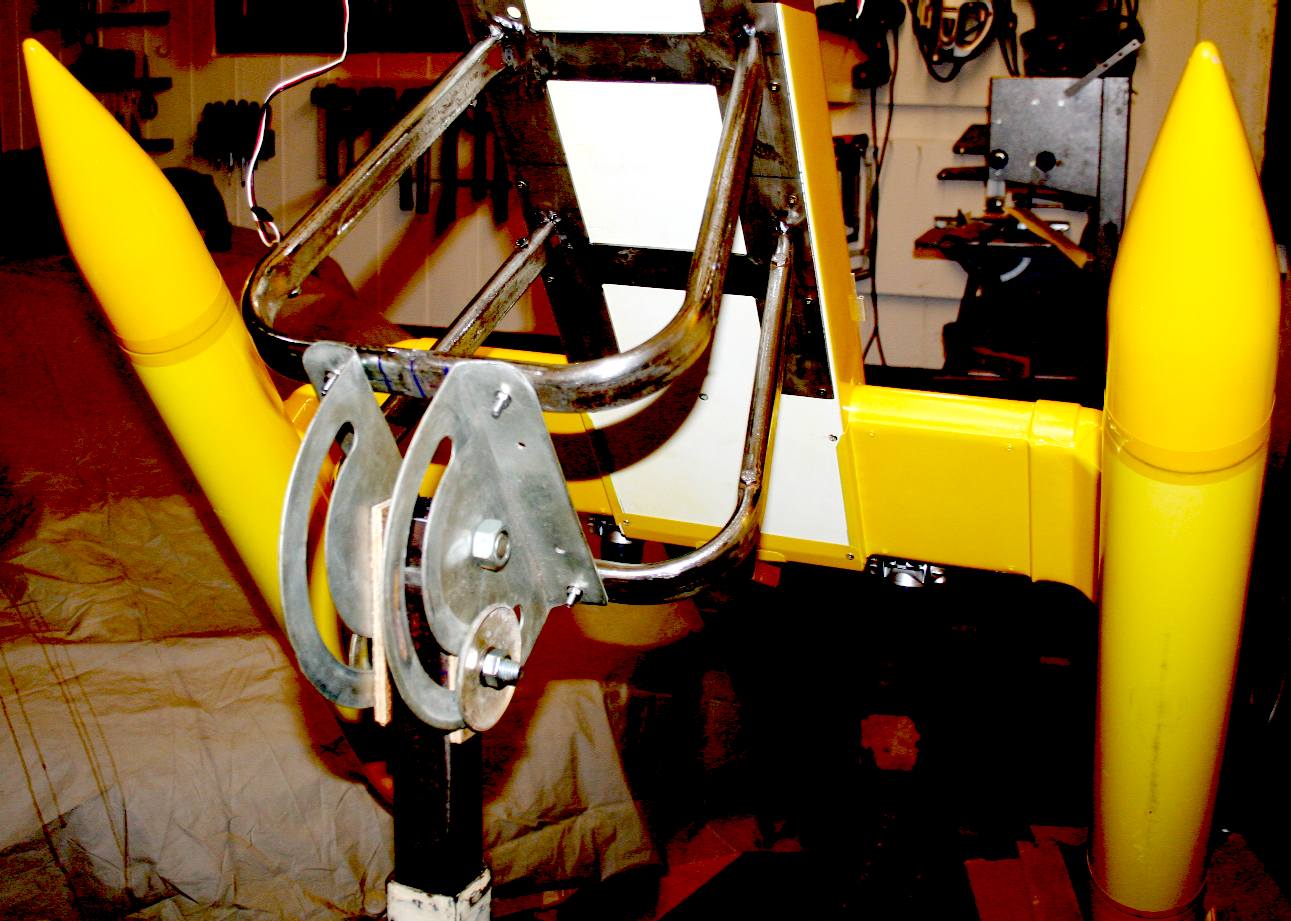
CRADLE HOOP - The cradle at the column upper end is clamped to a steel bar and the upper arms clamped between two 1" planks of timber. Not ideal, but accurate enough for hand construction, where minor fettling will ensure a good fit. The tops of these cradle frames will be welded to the base plate above, there are two of them. The base will be bolted to two circular steel sections that form a swivel clamp that will allow change of angle of the model display - simply by undoing a handle. The SeaVax suction assembly will pass through this loop with clearance to spare.
WELDED - The cradle frames and base plate welded nicely distortion free. Unfortunately, the method used to keep this plate flat means short welds, hence the finish is less than attractive.
GROUND BASE PLATE - Grinding a weld weakens the joint. Sometimes though, there is no option, as in this case. The base plate screws to the underside of the deck of the SeaVax proof of concept model. It therefore has to be flat, so as not to mark the boat. The plate is way over strength anyway, especially as the weld is full penetration from both sides.
CRADLE & SWIVEL ASSEMBLY - We use blue marker as a rough guide, with scribed lines as the marks for punching and alignment. The swivel plates are bolted to the cradle hoops. These small 6mm bolts were only used to jig for welding. They will be replaced with some more manly 10mm items before the SeaVax model is mounted. The cradle is a necessary complication where it was not possible to mount the SeaVax on the plastic treatment assembly that is suspended under the main deck of the hull. That would have been asking too much of some relatively complex machinery. Hence, the loads had to be taken around this obstacle, which is also the most important part of a robotic vessel designed to clean plastic from the oceans.
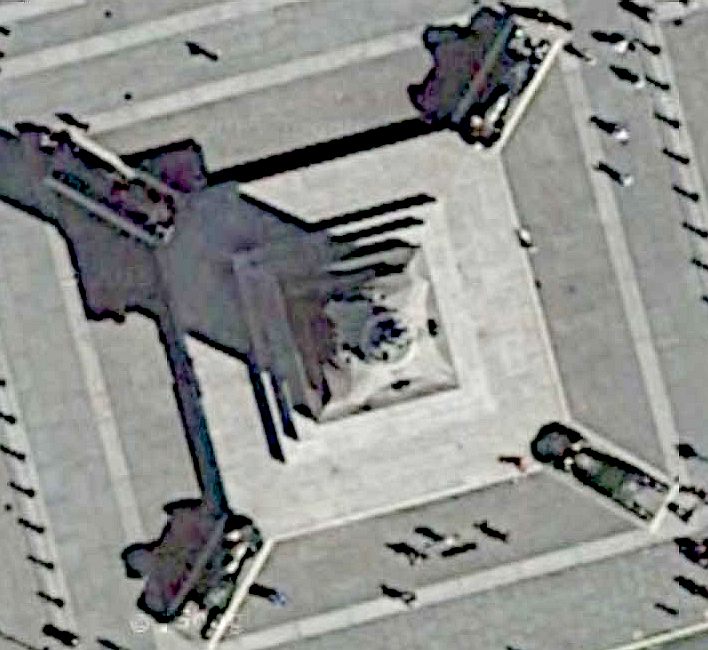
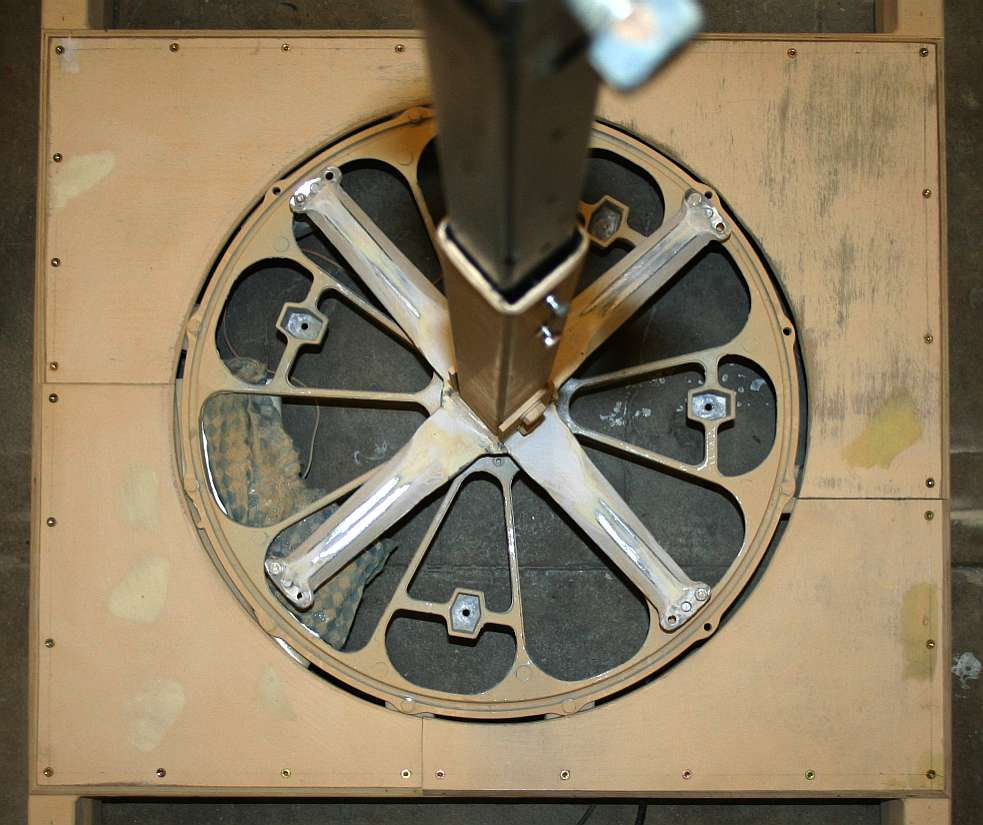
OBJECT RECOGNITION - This is as close up as Google maps gets using their satellite setting. In other regions the definition is better, as with the street function. You can though see that the pedestal cross-trees form the same shape as Nelson's Column, as with our show stand. Now all we need is a lion in each corner. See more details of the pedestal below.
NELSON'S COLUMN - October 8th: Okay, so Lord Nelson has been replaced with the steel cradle mount, and please excuse the jaunty angle of the photo on the left, the cameraman was not focused. These are end and side views of the show stand before introducing any offset in the inner sliding shaft, that may not be necessary. The inner shaft can be raised and lowered in 100mm increments with four securing bolts from inner to outer, to keep it rock steady. An offset may be needed to keep the boat model's rotation as close to it's centre of gravity (and as near inline as possible with the column). Tilting the cradle without an offset (or dog leg) may have the effect of moving the SeaVax off-centre of rotation by up to 200mm and that is not the effect that we are after. A little trial and error testing is next to obtain the best effect. The aesthetics of this cannot be appreciated on a drawing board - it has to be seen in action.
POETRY IN MOTION - October 9th: The plinth and column will be painted white for Innovate2015. The stand is rock-solid even at this angle and at any point of the rotation cycle. The clamp works like a disc brake on the steel swivel. Our friction (brake) pads are cut from 9mm hardwood ply, rather than the cellulose, aramid, polyacrylonitrile (PAN) and sintered glass composites that are used for car disc brakes, sometimes with a sprinkling of metal (copper) flakes and even clay and porcelain in the mix. The motor drive purrs as it powers the circular plinth at between a half and two-thirds of a revolution per minute.
For any interactive display use we may include a variable speed controller, that the rotation speed can be much higher. We might also replace the four circular pads with low-profile motorised wheels, so that the stand can be driven, or appear to follow visitors. Not though at Innovate 2015. Lastly, the tilt mechanism can be motorised, turning this innocuous stand into a Johnny No 5 like machine - simple fun for youngsters who might be inspired to one day build innovative robots themselves.
RECYCLE - This example of recycling is a good reason not to throw everything away. In fact, somehow, having a few bits and bobs lying around seems to stimulate the mind when it comes to ad hoc fabrication. Improvise for all you are worth and help us to save planet earth. We plan to motorize this function for displays in 2016. The movement will not be all that different from some cinema quality camera pods or even missile turrets.
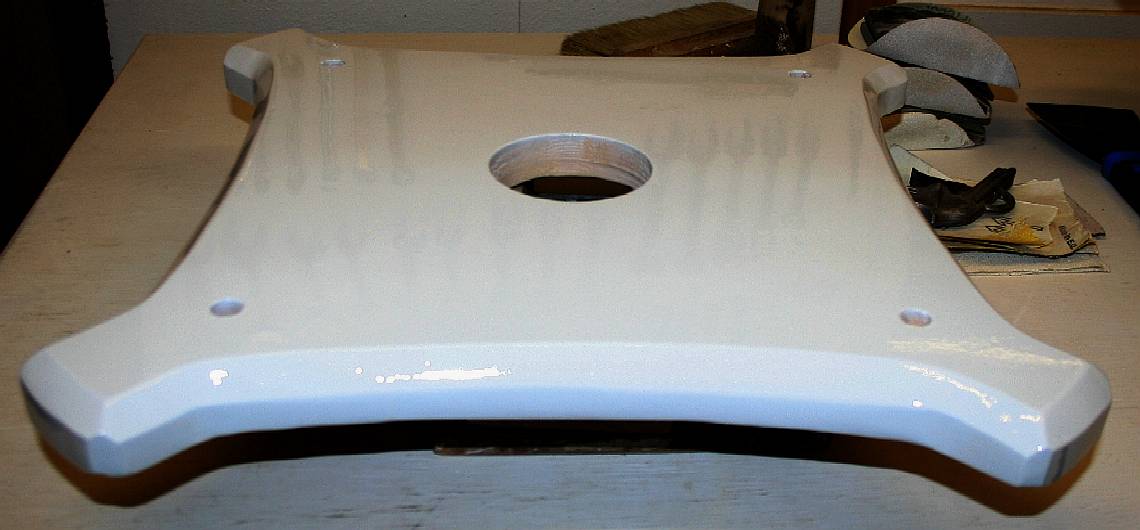
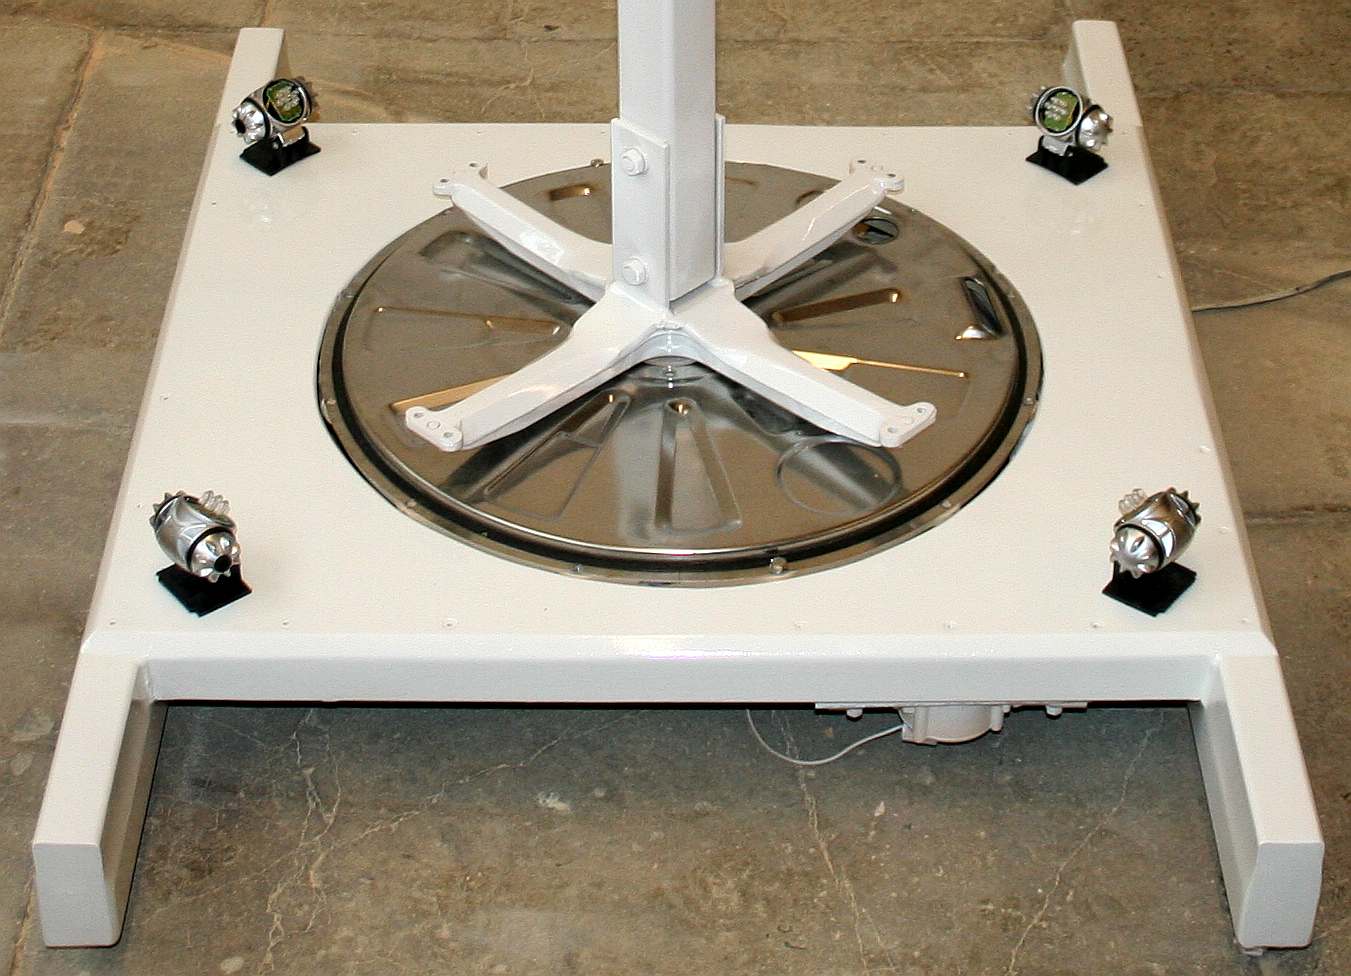
PEDESTAL - Left: This plywood base bolts to the pedestal cross-tree seen on the right. It will be sealed and painted in white to match other plywood panels (not shown) and the steel frame and column upright. Below this is a stainless steel cover with vent and service openings. You can see the aluminium heat sink below the vent (bottom left).
HEAT SINK - Where the power demand is more sustained than with an audio amplifier, we have added a substantial aluminium heat sink. This is bolted to the bearing spider and the smaller PCB mounted heat sink using plenty of heat transfer grease. With heat sinking (heat dissipation), volume and surface area are important, as is airflow. A good example of this is the VW air cooled boxer engine, except that the cylinder finning on that engine is cast iron.
POWER ELECTRONICS - This is the underside view of the heat sink which doubles up nicely as a water splash cover for the electrics. In service, reliable operation is crucial. Electronics that operate cool last longer, the same applies to motors. We can switch to a battery back up in the event of a power failure, or there being no power supply at road-show type mobile venues. While not in use the batteries are trickle charged. If solar panels are added, the whole display could operate more or less continuously from natural sunlight, just like the SeaVax vessel that is being displayed.
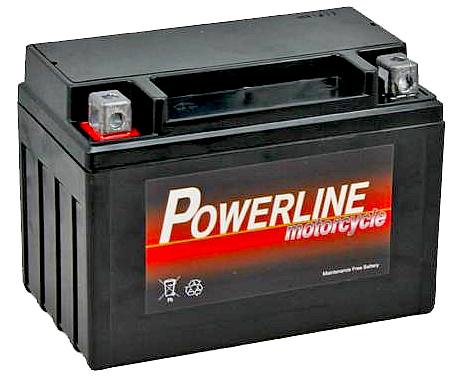
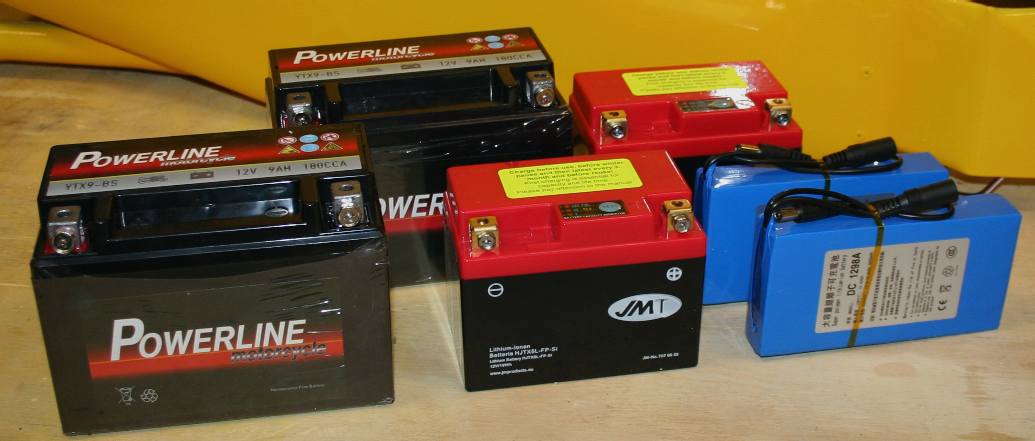
LEAD ACID (AGM) BATTERY - Four of these Powerline 12 volt lead-acid batteries will power the stand off grid for an 8 hour duration. They are the perfect size to fit in the base. Lithium polymer batteries could also do the same job. See the equivalents in the picture below. The Powerline batteries use Absorbent Glass Mat, or AGM technology, popular in the early 1980s as a sealed unit for military aircraft, and Uninterruptible Power Supplies (UPS). The acid is absorbed by a fine fiberglass mat, making the battery spill-proof. This enables shipment without hazardous material restrictions. Because of good performance at cold temperatures AGM batteries are also used for marine, motor home and robotic applications. They can be mounted at any angle.
LITHIUM ION BATTERY - Compare the JMT 12 volt units (centre red) to the Powerlines on the left. They use the latest LiFePO4 technology. Four of these batteries weigh just 1.6 kilograms, or 3.52 pounds. That is considerably lighter than the Powerline setup, but cost around four times the lead-acids. The blue LiPO units also offer the same output as the JMT units, but with with mains charging from a supplied adapter that is very much smaller.
SURFACE PREPARATION - Before painting any metal surface it has to be suitably primed and sound. That means removing loose of flaking paint, applying rust prevention treatments and where needed, other surface preparations, such as filling imperfections with polyester filler. Be sure to mask any sensitive moving parts before beginning these works.
PRIMING - Priming in the world of spray painting is also the undercoat. More correctly, the primer paint is also a filler to smooth small imperfections, sanding scratches and level the surface being painted so that it is flat.
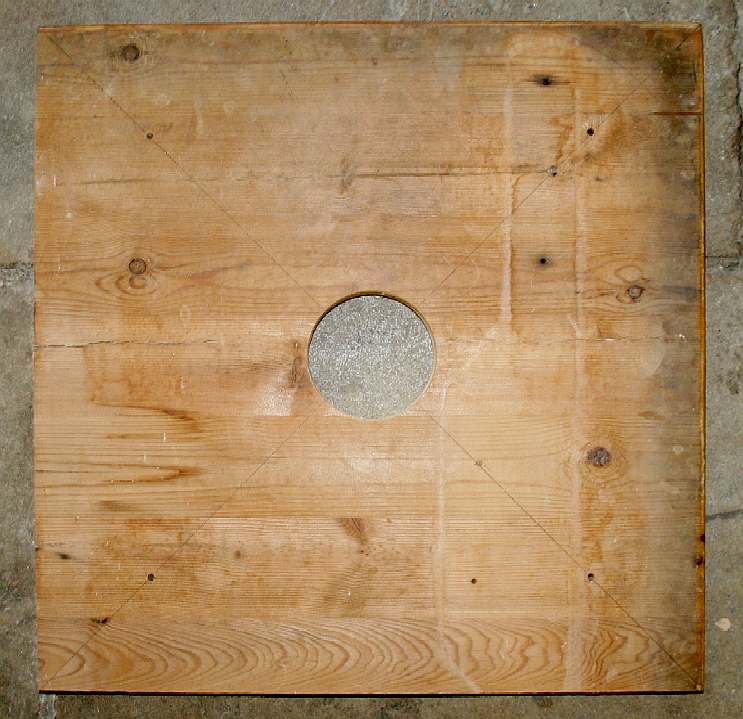
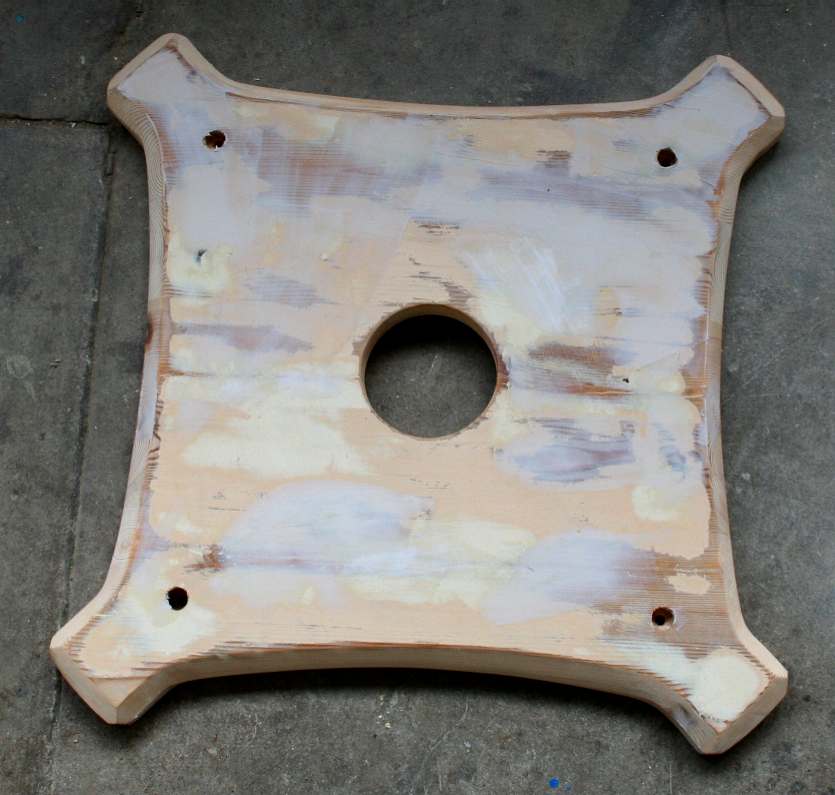
WOODEN FLOOR PANELS - The stand needs a floor in the four corners. We are using 11mm plywood for this. Each panel needs to be detachable for servicing. The wood will be sealed, primed and painted the same white and the rest of the plinth. The panels are not fully cut to size or trimmed in the picture above.
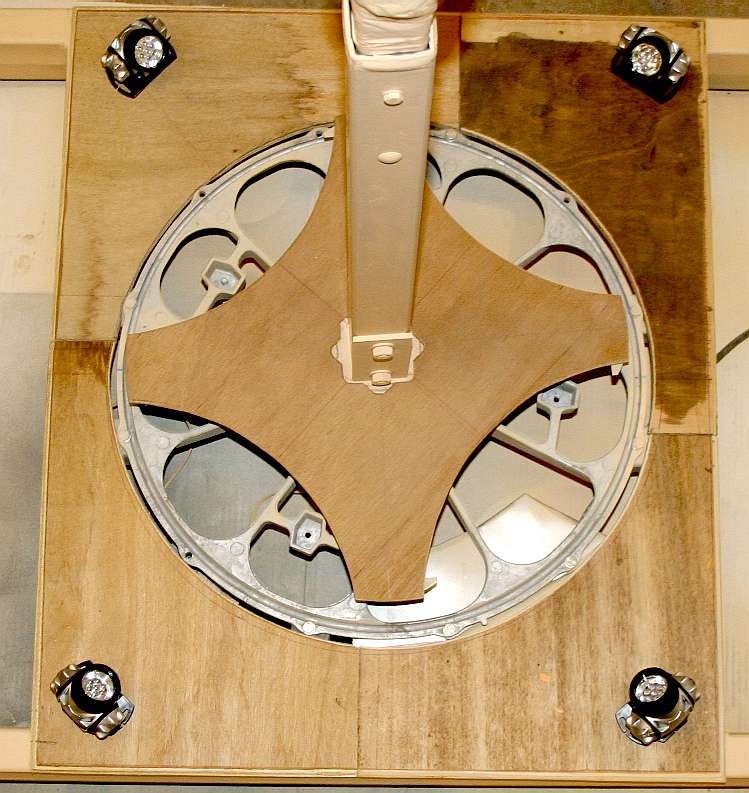
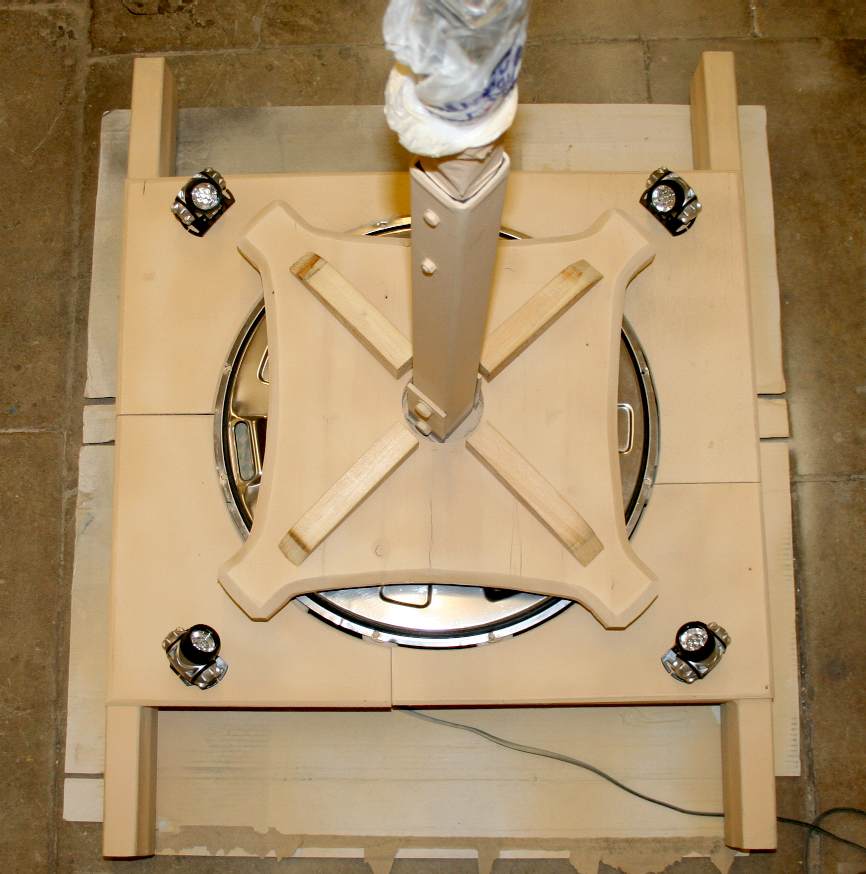
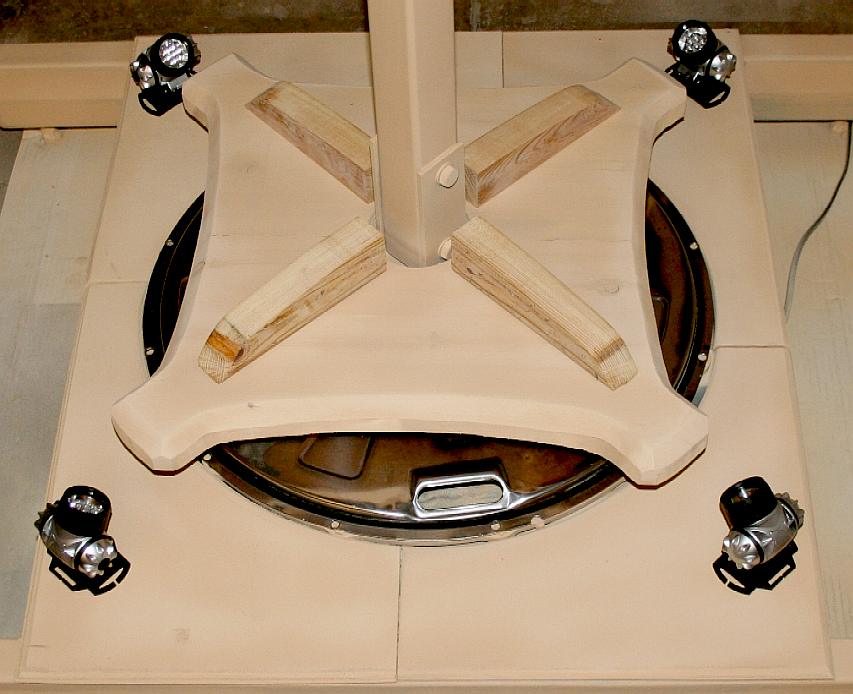
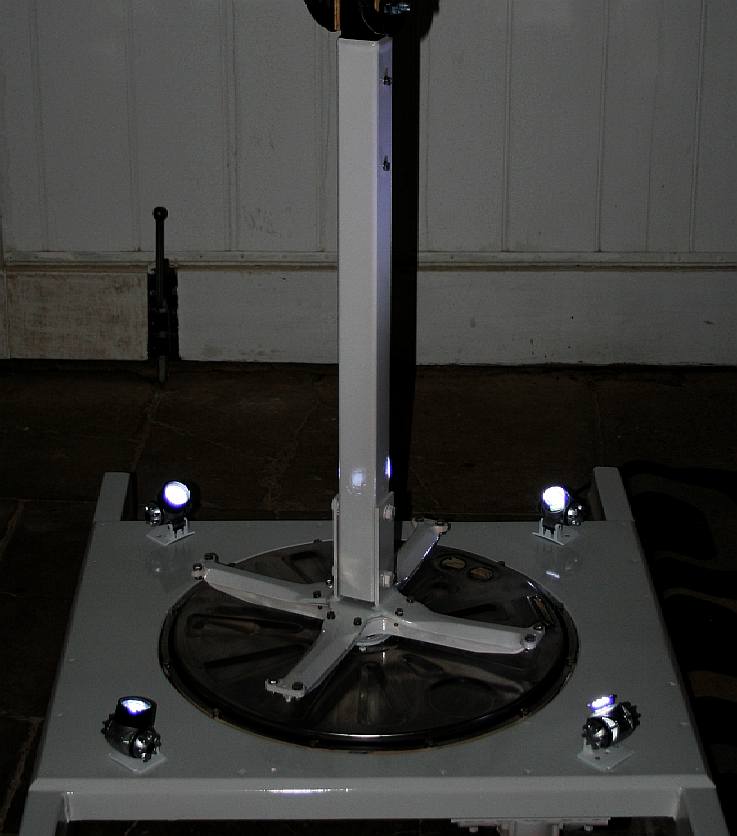
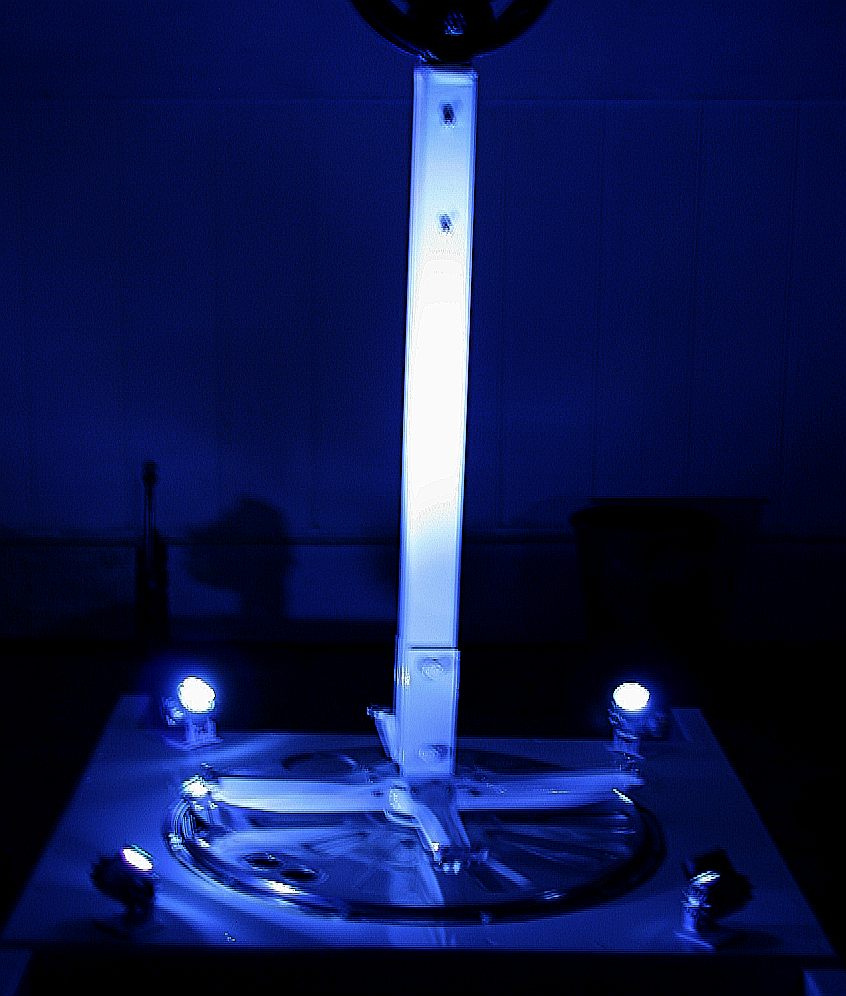
LIGHTING - The floor panels are beginning to take shape with beveling to the edges. The next step is to screw the panels to the steel frame for final trimming. Four LED lamps have been placed in each corner to try out potential angles for best effect. The revolving plywood pedestal proves to be too small. We will keep this for reference.
SHIVER ME TIMBERS - A larger plank of wood is selected to sculpt another revolving pedestal base. This is an important component of the display, where timing of lights and more can be from each revolution with certain triggers, mechanical, magnetic or optical. The timber is part of an old pine kitchen table-top (off cut) that is around forty years old - and had been kicking about the workshop for at least twenty years looking for a home. After marking out, the centre hole is cut first.
RECYCLING IN ACTION - Four holes are drilled to match the spider cross-tree radians. The pedestal is bolted to the steel cross-tree below to check for alignment. This pedestal timber is more robust than the previous plywood version. It can accept a deep bevel. The great thing about wood is that it is a renewable building resource, that also locks up carbon dioxide. Pound for pound, wood is stronger than steel in certain applications but is harder to join.
PRIMING - Priming in the world of spray painting is also the undercoat. More correctly, the primer paint is also a filler to smooth small imperfections, sanding scratches and level the surface being painted so that it is flat.
FIXING WOODEN FLOOR PANELS - The four separate plywood panels are fixed by clamping them onto the steel base frame. The panels must fit exactly and be chamfered and then holes drilled in a regular pattern through and into the steel box section. Those holes are then tapped to accept hardened self tapping type screws, since they will not need to be removed and are simply fixings.
BOXING THE COMPASS - The wood is primed at this stage simply to seal the grain. Note that the revolving pedestal is now beveled. The panels are not yet fixed. What a difference a coat of paint makes. Four miniature spot lamps are positioned in each corner of the plinth: North, South, East and West. They will be mounted on suitably styled blocks and also be painted white to match the base. Horatio Nelson's statue faces towards the famous battle where he made the ultimate sacrifice: Trafalgar. The square represents a symbolic compass for the naval hero. These days a compass is largely redundant where GPS is the norm, but basic navigation skills should be part of any sailors training.
LIGHTING - The standard LEDs in these lamps may need to be upgraded. The stainless steel shield below protects the bearings and provides cooling ventilation for the electrics. A clutching system stops rotation of the show model at the slightest touch.
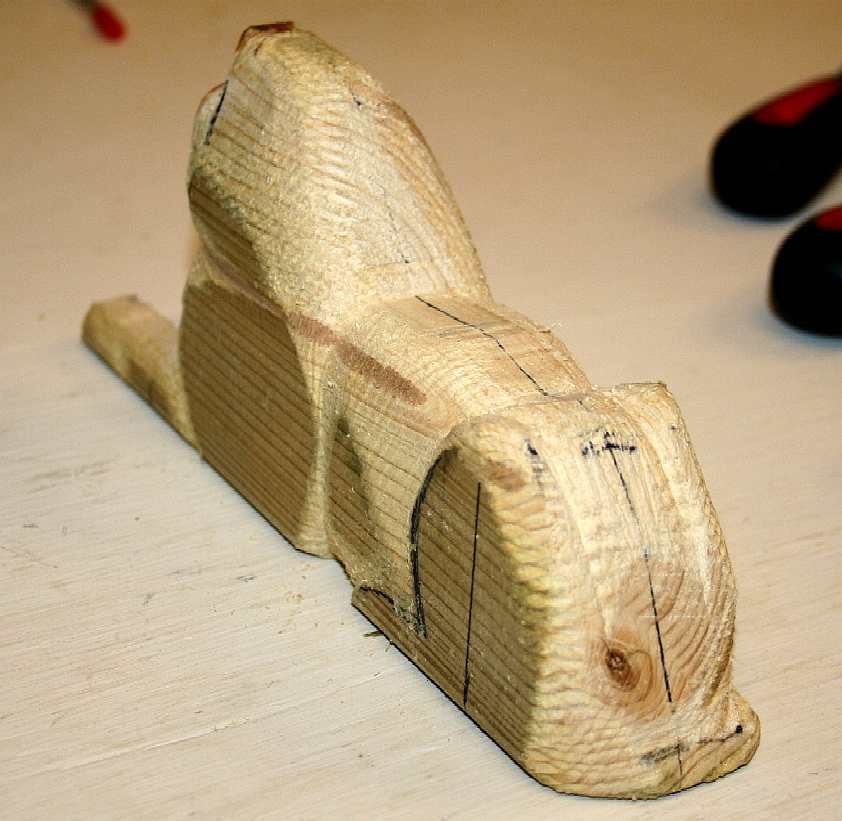
SIR EDWIN LANDSEER - On the theme of Trafalgar Square, Nelson's Column has four lions on the base that symbolically guard each corner of the Empire's compass. In 1858 the British government commissioned Sir Edwin Henry Landseer to make four 22 foot bronze lions for the steps of Nelson's Column. Our artist decided to have a look at carving a simplified version of Landseer's splendid works from a wooden block - at a scale suitable for our show stand. The time allotted for completion was half a day (4 hours). The team have not decided to incorporate the lions, it is just an art exercise at the time of writing using photographs of the lions that Sir Edwin carved as inspiration. Landseer is famous for his anthropomorphic artworks and the Monarch of the Glen painting of a Highland stag. See how to carve a lion like this by clicking on the picture above. These same skills are needed for making ship figure heads, along with a sharp set of chisels.
PLYWOOD DECKING - October 25 - The compass deck (or dial) is comprised of four panels that are screwed to the steel box section with no less than 30 hardened steel fixings. The deck is sealed with cellulose high build primer/filler, with re-cut bevel edges, but will need more fettling to get rid of surface imperfections before spray applying a white undercoat. The cross-tree ends have been trimmed, shaped and sanded. This gives us two versions of the stand, one for naval and boat shows, where the Trafalgar Square tribute will be appreciated and the other for technology events, leaning more to robotics. We may carve a scale version of Admiral Horatio Nelson to replace the cradle, should any organisation wish to hire this stand in relation to any historical or naval events.
SURFACE FILLING - Once fixed in place it is then possible to fine surface prepare for a white undercoat. Different colour primers and fillers allow the spray painter to see imperfections such as chips and scratches more easily as he progresses. Wear a mask so as not to breath in the dust.
TRAFALGAR SQUARE - The revolving base for Nelson's Column is fine surface filled. It will take more primer/filler coats and end grain sealing before we can apply a topcoat. As a natural material, wood needs a deal more surface preparation than metal, where metal parts are man-made and so relatively uniform. Wood has knots and grain to deal with.
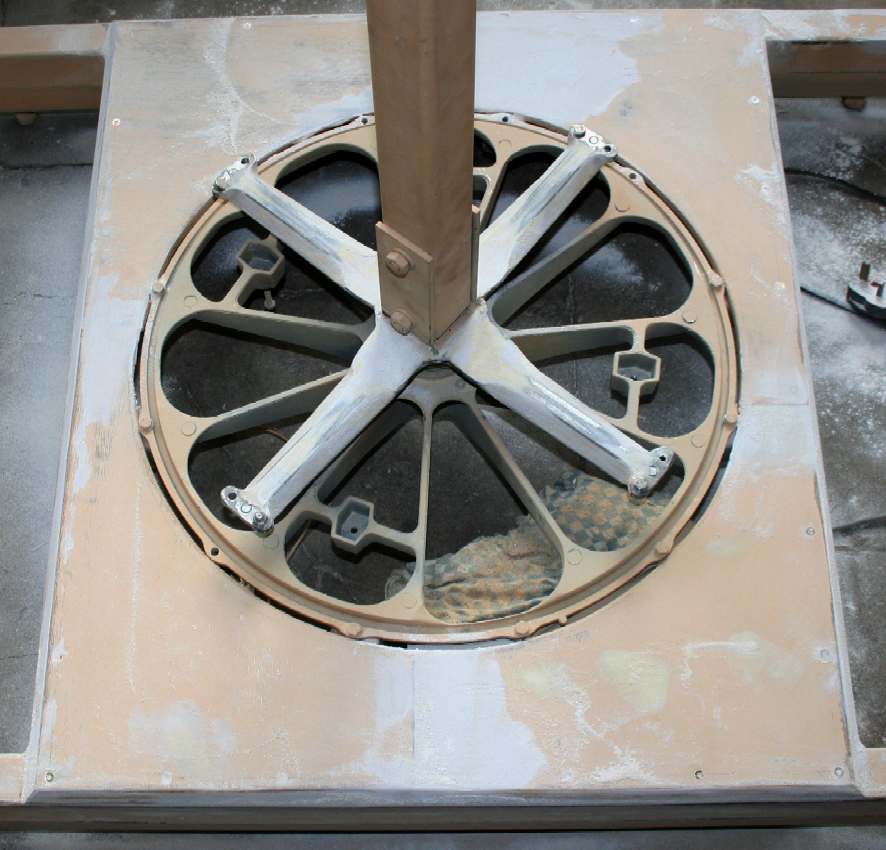
SPIDER - The spider-web bearing mount is removed from the stand assembly to prime and paint the cross-tree, otherwise it would be difficult to reach under the radians. This piece of machinery has a very Victorian look about it.
STAND BASE PRIMER - Oct 26. Looking a little empty, the stand is primed again, but will still need a micro fill to catch small blemishes and yet another fine sand, before applying the white undercoat. Use production paper 80 and 120 grit. There is no need to go finer for the white undercoat, but the white will need a fine sand using 240 grit before applying the 2-pack white gloss, or topcoat.
TRAFALGAR SQUARE REVOLVING BASE 2-PACK - Oct 29. The base of Nelson's Column is seen here with two coats of a good quality 2-pack paint. 2-pack paints are dangerous if the correct breathing apparatus is not used. We have extractor fans built into our roof that vent outside and even then it was not advisable to remain in the paint shop until the dust had settled. 2-pack contains cyanide. Interestingly, it was arsenic poisoning that contributed to the death of Napoleon Bonaparte, where the arsenic was a component part of the green paint in his house on Saint Helena.
NELSON'S COLUMN 2-PACK - Oct 29. As mentioned above, we have two exhibition options, meaning that the cross-trees can be on display with or without the revolving base for a Trafalgar Square theme. The show begins in 11 days time, when we deliver this stand to Old Billingsgate. We are booked to set up our display on Sunday the 8th of November.
TRAFALGAR SQUARE 2-PACK - Oct 29. Our spray painter had a bit of trouble with the gun not delivering the right paint to air ratio. This was down to a partially blocked nozzle. Spray guns frequently go unused for years at a time. Be sure then to clean your equipment thoroughly after use and before putting into storage. Now comes re-assembly; the fun part. Prudence dictates that we leave the paint to harden overnight - even though 2-part paints cure chemically very quickly, rather than simply air dry - so are ready to be handled immediately after baking in an oven, when painting a car for example. We do not have an oven. We just put some lamps on the work pieces for an hour, to keep them warm during cure.
LIGHTING - Oct 29. It's time to reassemble all of the painted components and wire up the lights. LEDs hold the potential to save huge amounts of energy for planet earth, where they are so much more efficient that Thomas Edison's (and Joseph Swan's) incandescent light bulbs.
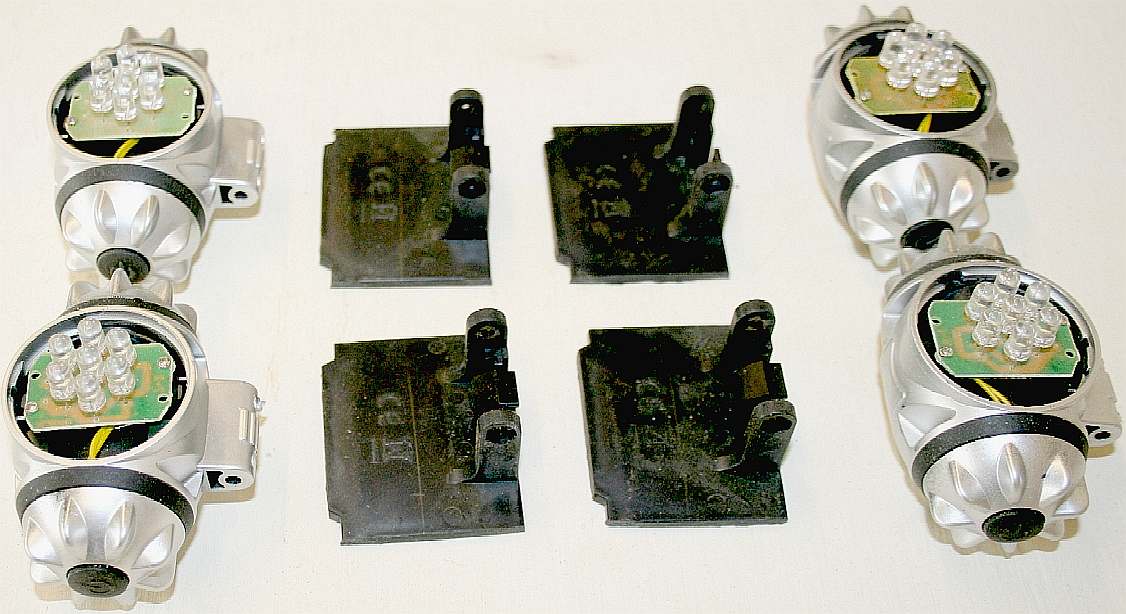
SPOT LAMPS - These housings are used by many manufacturers for their LED head torches. They are convenient for us and easy to modify. Use the cheaper versions with 7 LEDs to experiment with and upgrade the light element to 12 LEDs, or even a car headlight unit, if you really want some punch, but be careful not to go overboard - because the power pack will need to be that much bigger. We use the same units on our proof of concept vessel to house infra-red and other sensors.
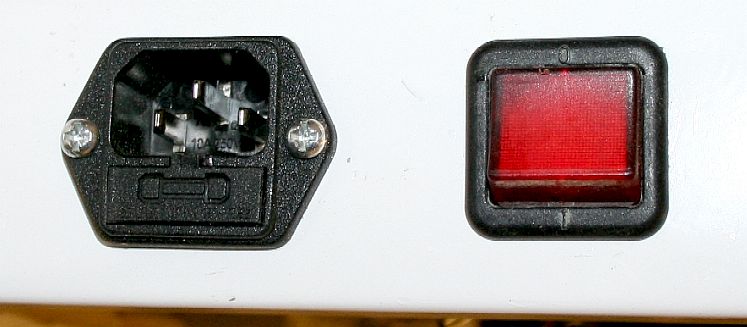
ELECTRICAL - [LEFT] On-off and fused kettle lead socket are below the main chassis of the stand on one side. The motor power pack is independently fused. [RIGHT] We decided to use a separate step down transformer for the LED lighting. You can switch this (Tandy) unit for different voltages, between 3 and 9 volts. 4.5 volts worked best, but the unit ran a little too warm for our liking - and you know how much we love large heat sinks. Tandy, or Radio Shack, as it is known in the US has not been around in the UK for many years after all 270 stores were sold to the Carphone Warehouse in 1999. Tandy still trade online. That is how old this recycled part is - but it still works well - and with suitable heat dissipation finning it should give years of trouble free service. Maplins sell comparable products in stores all over the UK.
WIRING - [LEFT] 5-11-15 Threading the low voltage cables to the LED lights. We use choc blocks on the low voltage circuit to split the feed for four spots. The lighting transformer ran a little hot for our liking, seen here open to the elements for good airflow. [RIGHT] 6-11-15 We added a large aluminium heat sink for the lighting transformer and added a guard. Even after 4 hours of continuous operation the transformer was only bearably warm - a great improvement. The harness was tidied up under supervision of our Portable Electrical Appliance (PAT) tester, who certified that this installation was safe.
LIGHTING DISPLAY - Testing out the spot lamps in low light conditions. At night it can look a little Cathedral. Is that good or bad? Probably good.
WORKSHOP - Chris using a small grinding wheel to clean up some components for the SeaVax project.
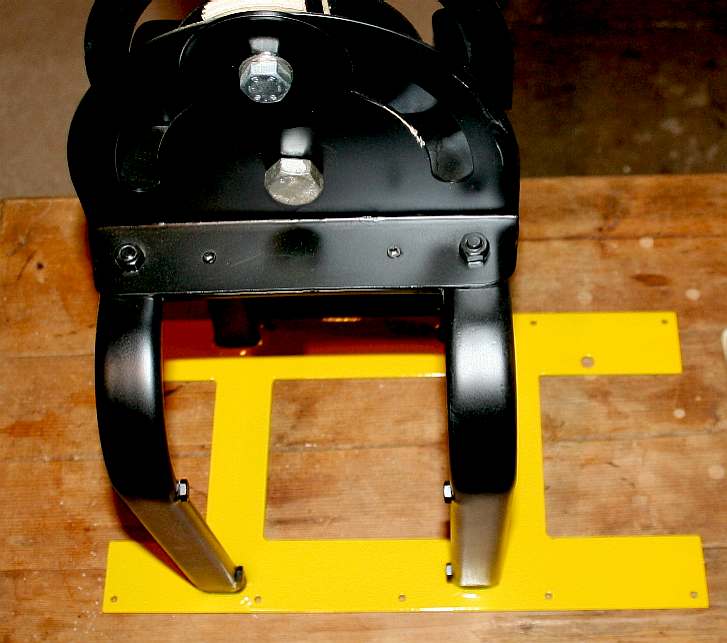
CRADLE & SWIVEL - The cradle assembly must not detract from the ocean cleaning head that passes through the middle of the cradle hoops. For this reason the cradle is painted matt black. Whereas the "H" base plate that attaches to the underside of the deck should be the same machine yellow as the rest of the boat on display. By this means the focus of visitors will be on the ocean cleaning apparatus rather than the protection surrounding it. You can see the painting sequence above. First paint the frame black, then mask the cradle frame and paint the "H" plate machine yellow. Simples. Be careful when removing the masking, not to get flakes of paper or paint on the fresh surface.
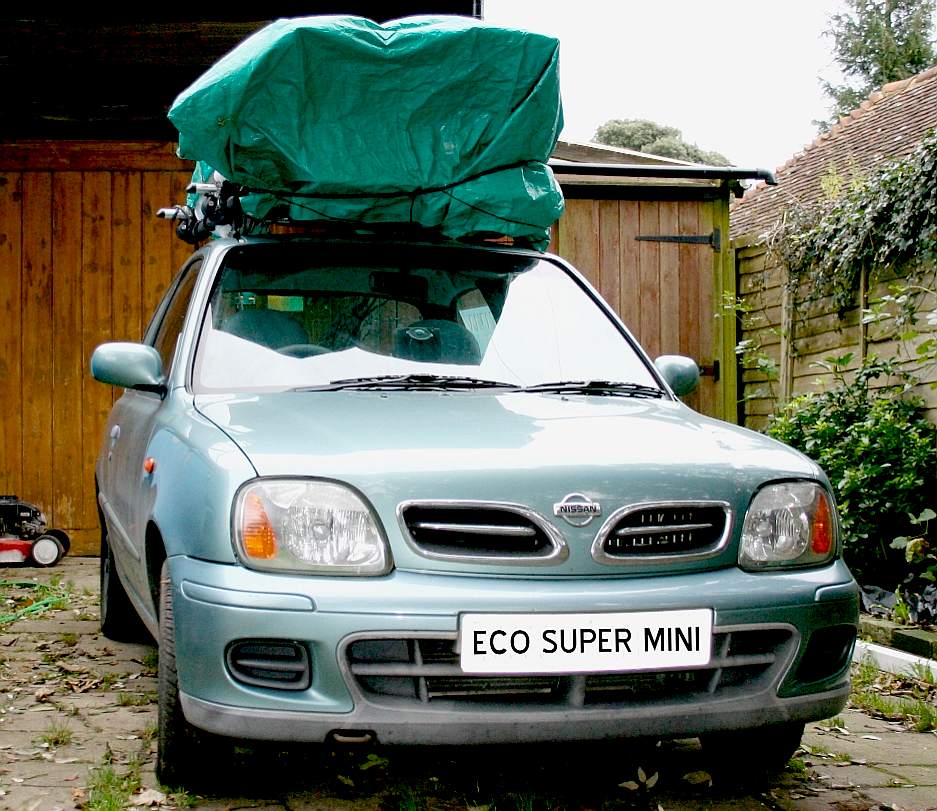
NOVEMBER 1 - We are nearing completion on the stand. The hotel has been booked and we are working out how best to transport the stand and concept model to the show economically. We will be using a modified super mini to get us to London and back with the smallest carbon footprint practical.
LOGISTICS - The trip to London and back to Herstmonceux, which included a leg to Woodford from Old Billingsgate twice, cost just £25 in fuel despite the extra drag from the increased frontal area of the vehicle. Now that is what we call economy motoring. Well done Nissan. On top of this was the London Congestion Charge £11.50 and the Dartford Crossing toll charge £2.50. These add-ons were almost as much as the fuel. The message is clear, stay away from London. Read more on the actual event by clicking on the car.
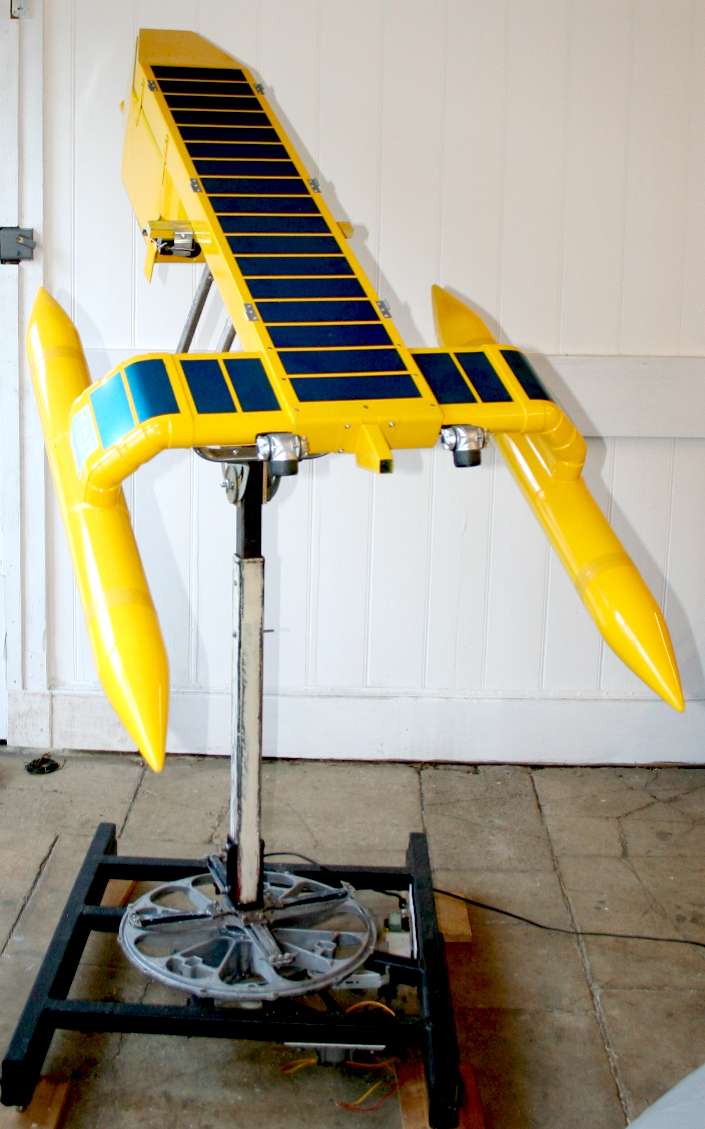
THE SEAVAX STAND WITHOUT BOAT AFFIXED
RECYCLE - This is why we are going to all this bother: Rope, rusting cans, styrofoam and bottle caps. They say "out of sight, out of mind." And that is so true. That is why the ocean gyres managed to build up to twice the size of Texas before anyone started paying attention. We all need constant reminding of the harm we are causing, especially politicians and businesses, who in the past hoped that nobody would notice if they dumped all their rubbish out at sea. The Marine Pollution Act was supposed to change all that. Not so far. Not one bit of it. Our politicians approved the legislation, but secretly hoped that the ocean would self-clean.
THE
GUARDIAN 19 MARCH 2015
INCREDIBLE - There are almost no beaches in the world where plastic waste in not a problem. Humans are very messy animals who appears to care very little for marine life.
CALL TO ARMS - Yes, history repeats itself. Your country needs you to re-evaluate your throwaway habits, the 1st World War poster featuring Lord Kitchener with his dramatic moustache is spot on. "V" is for Vax, 'SeaVax,' in the fight against ocean pollution. Sir Winston Churchill was right, we will fight the problem on the beaches.
LINKS & REFERENCE
UK Trade and Industry Innovate 2015 http://www.innovate2014.co.uk/ http://www.hripley.co.uk/ https://www.events.ukti.gov.uk/innovate-uk-2015/showcase/bluebird-marine-systems-ltd/ Daily Mail UK news science technology how Nelson's column was cut down in size by 30ft http://www.maplin.co.uk/ http://www.tandyonline.co.uk/ http://www.dailymail.co.uk/sciencetech/article-1322027/How-Nelsons-column-cut-size-30ft.html https://www.events.ukti.gov.uk/innovate-uk-2015/showcase/bluebird-marine-systems-ltd/ http://www.keepbritaintidy.org/ http://www.nytimes.com/2015/03/15/nyregion/the-wet-wipes-box-says-flush-but-the-new-york-city-sewer-system-says-dont.html http://www.kentonline.co.uk/canterbury/news/wet-wipes-to-blame-for-5236/ http://www.theguardian.com/environment/2015/jan/28/sea-turtles-fall-victim-to-alarming-flood-of-plastics-entering-australian-waters http://www.mcsuk.org/ http://www.theguardian.com/environment/2015/mar/19/dont-flush-wet-wipes-toilet-conservationists http://www.hripley.co.uk/ https://www.events.ukti.gov.uk/ http://www.businessopportunities.ukti.gov.uk/ https://www.events.ukti.gov.uk/innovate-uk-2015/registration https://www.events.ukti.gov.uk/innovate-uk-2015/
|
||||||
|
OLD BILLINGSGATE - Bluebird Marine Systems are an approved exhibitor for Innovate2015. Never mind the declining fish stocks and toxins in our food chain, why not visit us in London in November to talk about your pollution problems. The SeaVax might be right for your council's duty to meet with European bathing water standards. What is interesting is that most of the beaches in the UK do meet with the *** star and above rating (good) when in reality the beaches are strewn with waste. This tells us that European standards are not taking into account plastic pollution. Hence, not requiring local authorities to do anything about the rubbish on their doorstep. The problem with local authorities is that unless you tell them to do something - usually with the threat of some serious penalties, they will not be proactive.
SEAVAX TO THE RESCUE - Like a scene from the 'Thunderbirds' television series and International Rescue, the SeaVax autonomous vessel could offer a solution to ocean pollution. Please help us to make that a reality by supporting our project.
|
||||||
|
This
website is Copyright © 2015 Bluebird Marine Systems Ltd. The
names Bluebird™,
Bluefish™,
Miss
Ocean™, SeaVax™ and the blue bird in flight
|